
![]()


James Miller is a talented guy. Apart from designing a lot of my graphics and the background for this site he has been my right hand man on many of my UK shoots. Having a talented shooter as your right hand man makes your life so much easier. He has become synonymous with “lens whacking” which he explains about here. You can see more of James’ work on his vimeo page here. One bit of advice. This is a great and cool effect. But like all effects use them in moderation for the most impact!
After James’ article there is a link for 5Dleaks.com and Lightfilth from Lens Anarchy. Both are a collection of real light leaks that you can add in post. Not the same as what James does but a cool effect and a nice cheap price of $19.99 nad £15 respectively. There is a 20% odd code right now too for 5dleaks. Details at end of post

Lens Whacking, whats its all about then?
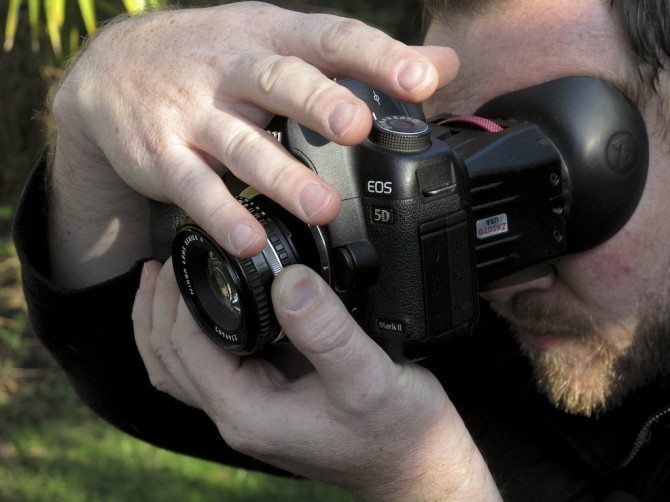
When a cameras lens is fixed firmly to a camera the only light falling on the sensor is through the lens. Thats great most of the time and when you want something different you can either add effects, layers, overlays in post. Or you can remove your entire lens.
“When you take the lens off it creates an effect, look and feeling that is totally different, you really can connect to image. Because it’s real and not added in post, it’s randomness gives a dreamlike quality. Its almost like how your mind remembers images and I love the feeling it gives. Its a romance, it really is.”
Romance of the Light from James Miller on Vimeo.
Soundtrack: Bon Iver, Holocene
Nina Naustdal – Couture / Celebrity Launch Party from James Miller on Vimeo.
How does it work?
Removing your lens is going to let a lot of light to hit the sensor. In a total wash of light there will be no image, so this has to be controlled. We you really want to achieve is a part sharp image but lots of flare and light leaks going on within the frame. This effect will wash the image with what ever light source is dominant in the scene behind the camera or to the side.
The effect is similar to a tilt and shift lens where you only get a slither of focus depth or you can manipulate the lens to allow the entire frame to be in focus.
What do I need?
Lets say for this example you have the Canon 5Dmk2, a full frame large sensor camera.
It’s no good trying to use a Canon lens EF or FD as the distance between the rear element and sensor (The Flange distance) is too small. You need a Nikon lens, not with a Nikon to EOS mount, just the lens.
As lens whacking really needs to be created hand held on a full frame sensor a lens upto 50mm is about the limit otherwise your going to induce to much wobble, rolling shutter. On a cropped sensor 7D, 600D or Sony FS100 or Canon C300 you really need to work a 35mm lens, 50mm is doable but you have to be careful. As its very easy and cheap to buy a old E Series Nikon 50mm 1.8 (around £30-£50) I suggest you start here.
Also the E Series is pancake in construction so your hand won’t suffer from fatigue so much. If you have a non Canon lens try it out.


How do you control it?
You can control the amount of light hitting the sensor but one of two things. First is to use you hand, the hand not holding the lens and cup it over the back of the lens. You can fan your covering hand by opening your fingers, letting more light in where necessary.
Second you can adjust the focus on the lens. The standard for shooting Lens Whacking is for the lens to be set to infinity this allow just the right amount of light coming in from the gap between the lens and the body. But if you change this distance you will notice to achieve a focus you will need to keep the lens closer to the body of the camera and this closes the gap thus reducing the amount of light leaking in.

How do I Whack?
1/ Start by setting the camera to live view.
2/ Open the aperture fully on the lens and set the focus to infinity. If the lens is inherently soft wide open then stop the lens down a click, this will effect the look and structure of the ‘Bokeh’.
3/ Hold the camera body to your chest with your right hand.
4/ Pickup the lens with your left hand.
5/ Still with the left, hand hold the lens tight up to the body of the camera with your thumb and index finger whilst pinching the middle finger of your left hand, causing the lens to rock on this pinch. (This is how you change focus)
6/ Try and use your left hand palm to act as a hinge that allows the focus to be adjusted by changing the gap between the lens and the body.
7/ If your worried about dirt or dust getting on the sensor 1/ Don’t do it. 2/ Cut out some good optical quality polyester film like Melinex and fit it under the camera bodies lens mount, on top of the contact pins. Has to be good quality otherwise you will get blooming on highlights. You can also use ND filter film acting as a dust blocker and filter. (Filters on the rear of the lens are very forgiving).
Focusing will be daunting at first but practice and it will feel more natural than turing that ring, I promise.
I find when Lens Whacking on the 5D mk2 using the Zacuto Z-Finder is critical for immersing yourself in the shot and stabilising the picture. It’s just the same otherwise.
Why not just use a Lens Baby or similar toy lens?
Really the effect, look and feeling is totally different. I loose my self in the moment, you really can connect to image. Its almost how your mind remembers images and I love the feeling it gives. Its a romance, it really is. And it’s free.
How can I add Lens Whacking to my existing films?
You can’t get the full effect in post. An besides you loose the feeling. Sure you can replicated some of the look but its very post intensive. Light leaks can be achieved by shooting with you lens cap on and just Lens Whacking blank. The files produced can then be used as an overlay.


Examples I have shot on the Canon 5Dmk2:
Leuven, Belgium – Oude Markt, Terras from James Miller on Vimeo.
The Plea “Feel It Ticking” from James Miller on Vimeo.
De Madammen in Amsterdam from James Miller on Vimeo.
London Meet-up with Philip Bloom from James Miller on Vimeo.
90 Seconds in Leuven from James Miller on Vimeo.
BPM Dance Academy from James Miller on Vimeo.
San Francisco was noticed by an Belgium Director/ Music Man, Frank De Wulf. This was really a turing point for me. And for that I will forever be grateful. Thanks Frank
San Francisco from James Miller on Vimeo.
Examples I have shot on the Sony NEX FS100:
The Plea, Live in Ghent, Belgium from James Miller on Vimeo.
Jack Campbell Vampire Weekend, Mansard Roof from James Miller on Vimeo.

20% off code for 1 week only with code philipbloom at checkout expires on 8th February 2012

LightFilth by Lens Anarchy: Trailer from Miguel Santana on Vimeo.
45 comments
Great post, James! Always liked the look of your stuff.
Thought I should mention, I’ve also created some post-light effects for sale. Though our pack includes soft leaks, as well as glitches and other funky light filth. http://www.lensanarchy.com – £15, oh, and we made them first ; )
Oh, nevermind. Philip kindly put it in the post too!
I would have liked to purchase both collections,
but went ahead and purchased the 5D leaks with Phils
discount code for a total $15.
I received nearly 3 gigs worth of 50 clips at Pro res 422.
I would love to purchase the lens anarchy
but having no coupon code, only 19 clips and a price of $24 U.S.
is what I based my purchased on, Maybe bringing it down to $15 to compeat even for
a limited time will help you make more sales and support Phils site.
Looks like a wonderful product and looking forward to putting it in my collection for future use.
Cheers!
Thanks but neither support my site. They just support the guys who made these. I don’t get anything from it!
Well than thank you once again Sir for the great discount code. 🙂
He still should drop the price a tad bit to make great competition, although I bet its a great product none the less and he deserves what he ask for.
I hope people dont just start using these through out the whole time line….
Thanks! once again Phil.
-Serge
I was fortunate to work with James last year and see him use this technique in action. Since then I have been giving it a try. It does give some excellent results, all in camera, when done right. Personally I like the effect (I know it is not to everyones taste). I have a large backlog of old 8 mm and it reminds me very much of light leaks coming from cine. James is a master at lens whacking. He makes it look easy and I can tell you it isn’t that easy. He was kind enough to give me a run through of the technique. It requires practice and a skilled hand to balance lens, camera and focus, and controlled light. Using a lens with a somewhat loose focus barrel helps as it reduces resistance. I’m still very much in practice mode but hope to become skilled enough to use it more in projects. Great blog – the secret is out!
Great technique. I’d love to see a BTS video showing the technique used. I use Gh-2. Would love to try it.
Its very simple. Just follow the instructions and try it out!
With the GH2, it’s far too easy to let in FAR too much light since most full-frame primes normally require a ~1.5″ (~35mm) adapter. This means, ideally, you’d have to leave about that same amount of gap between the lens and body (otherwise you’re stuck in perpetual macro-land if you use the adapter collar).
So to get infinity focus and also your light leaks, but keep them manageable, you need some sort of intermediary besides the adapter… this can be anything from part of a TP roll (empty, preferably) with gaffer tape or blackwrap (attach to the lens), an adapter collar for a lens with a shorter flange distance (ie, FD if using, say, OM mount lens) or more ideally, a set of macro extension rings for the flavor prime you’re using.
On the decidedly plus side, you can also make a specialized “whackadapter” beginning with an inexpensive C-mount adapter as your base… leave it empty and glue a small amount of filter material over the open port to protect against dust and the like.
Kevin,
Thanks for posting; this confirms what I experienced in trying to lens whack with my GH2.
I’ll have to try again with a homemade whackadapter!
Love the look and feel of lens whacking. Very organic, dreamy, romantic. I’ll be trying this with my GH2.
Hmmm… having trouble getting this to work with my GH2 and a 35mm Nikkor. Focal range is very limited and it goes from slight light leak to blown out in a hair’s breadth of movement. Perhaps is only works with full sized sensors?
not at all. it’s just requires a REALLY gentle touch!
See above for some recommendations with the GH2.
Leave off the adapter collar, add some macro extension rings or the like to block a little light, set the lens to infinity, and control focus with the distance you hold the lens from the sensor.
Not a fan of this its a sure fire way to get dust and all sorts onto your sensor.
then don’t do it sir! Leave it to the bold, adventurous ones!
Someone else who does lots of lens effects is Daniel Peters http://vimeo.com/imacanon he a great guy and loves to share his ideas. http://vimeo.com/35522105
Nice images! I just tried this with my 550D and a SMC Takumar 28mm held in front, and it worked a treat. Worth playing with — thanks.
I was inspired by James Miller last year and shot an art film with the technique. Watch it at: http://youtu.be/ZFHuFcXIY-w
Great, now that large sensors and razor sharp images have finally killed off film, everyone is going to be trying to get that “film” look. Selective focus, with light leaks, it’s all beautiful in a chaotic sort of way. It’s amazing with the imaging progress made in the last few years that people are still trying to emulate film.
Kinda makes you go hmmmmmm…Why did we abandon film?
Alan
“Why did we abandon film?”
Because of its cost.
This looks like a very, very cool technique. I’ll give it a try on my 60D w/ the Nikkon 35mm AI
Thanks for the post, great results in the videos! Any idea how the Nikon 50 1.8 E would work with 7D cropped sensor? What about best specific lenses for whacking on cropped cameras? Thank you, Best, E.
LOVE the way this feels!
gave it a try myself, have a look! 😀
http://www.youtube.com/watch?v=FOI9Dyh4vLM
I’ve found this effect is much easier to do with PL mount lenses.
So, which one to download…
I am doing a lot of my simple work in iMove11, which is just fine for much of the stuff that needs to get done. But I also want the flexibility to work in FCP X as well.
Pro Res 422 or MP4? 24P.25P, or 30P?
Which version would provide the best flexibility to work in HD on both of these software platforms?
Fantastic, its creates a kind of nostalgic look, very impressive. I’ll be using this technique for a huge art show in Buenos Aires this May. Thanks so much for sharing!
Philip I shoot on a 60D and I recently bought four Minolta MD lenses 20MM, 35MM, 50MM1.4 and 100mm. Have you ever used them? I’m really pleased with the results I’m getting out of them. I’ve been practising “lens wacking” with the 35 too.
Little help…
1. Couldn’t I buy the 30p version and use it on a 24p timeline? I would only question that the effect would be somewhat slower, which may diminish the effect.
2. I’m currently using FCP 6 and may be switching to Premiere Pro CS5. Wouldn’t it be wise to buy the MPEG 4 instead of ProRes? Or is ProRes compatible with CS5?
Thanks,
Frank
Frank,
You can always contact them directly, but sure you can.
you can have the 30FPS version for video and the 24FPS version for your film looks. You can always use something like http://www.squared5.com/ to make a second copy of all the effects from 30FPS to 2FPS and then you end up with both the 30 and the 24.
http://www.squared5.com/ Is a free converter by the way, I hope that helps to answer your question.
I purchased the Pro Res to use in Final Cut but it opens up fine on my Windows 7 Premiere with CS5.5 too.
Frank,
I hope others chime in to back me up or correct me, but I think I’ve got your answers:
1. Yes, you’ve got it right. Of course, you could also use 24p version on a 30p timeline and it would run a little fast… Your preference entirely.
2. ProRes is compatible with CS5 so long as you have the ProRes codec installed on your system, which is only available with FCP installed. So as long as you keep FCP6 on your machine, you can use ProRes material in Premiere.
My guess is that when you blend these in with your footage using composite modes, the final product will be the same whether you use full quality ProRes versions or compressed MPEG 4 versions, as long as thy are high-quality compressions. However, just to be sure, you could download the ProRes and then use Compressor or Adobe Media Encoder to make copies of the ProRes files in other formats, including MPEG 4.
Anyone else tried these? Are they worth my $16?
A great post! Thanks a lot for this.
SInce I have a lot of clips I want to “whack” in post, I had to get both packages – and they are amazing! 🙂
Cheers,
jonni
Thank You!!!
Everything ingenious is simple
Had a go with the post stuff about a year or so back, http://vimeo.com/20163916
so excited about learning this method in camera, already had a little go with an old takumar 55mm, beautiful dreamy effects. The James Miller launch party film is very inspiring, we may not be able to reproduce that, but now we know how he did it which is a start!
This is one of the coolest techniques I´ve seen for a long time… I’ll try it for sure….
This is a fascinating article.
I was inspired by James Miller’s ‘Meet Up’ film to attempt some lens whacking on a music video a few months back.
http://vimeo.com/29605579
I found it tricky to hold a disconnected lens steady for long in the freezing cold. In the end I resorted to using BluTac for some some shots. There’s definitely a gap in the market for some kind of ‘whackdapter’…
Loved “Romance the light”. It really got me thinking of new ways to use the C300 to give it a very classic film look. I have a ton of old Canon FD mount lenses from back in my Letus Extreme days that could really do a lovely job at something like this.
hi james
need your help !
which adapter you use on fs 100 with nikon 50 1.8 lens for lens whacking ?
Hi guys,
Not sure if you are still checking this post but I have a quick question. Ive just started giving lens whacking a crack and I’m wondering if you recommend a certain picture style when shooting this way. I.e. rather than shooting with a neutral style as you maybe would for conventional video, do you shoot with more saturation, contrast etc in camera to try and boost the effect of the light leaks? Interested to hear your thoughts on this.
Cheers, Matt
lovely use of of shots and the lighting was superbly done. watching the doc made me instantly buy the CD! cannot wait to listen to the whole album. such a a talented artist. the intro although could have been boring, but the use of shots to show the story of Olly making the tea and setting up the recording made the whole experience really interesting and mesmerizing! Well done to all who work on this project! Smashing!
I have to admit to being very sceptical about lens whacking – I’d seen Den Lennie try it out, and watched the videos above… and figured I should have a go before writing it off as an idea.
In the end, I loved it! Went out for a walk with my wife and daughter and shot this just as an experiment (it’s only 50 secs long)… https://vimeo.com/54731109 …in fact, I’m used to shooting much more educational stuff rather than anything that is ‘freeform and creative’, so the opportunity to try something new was great.
So, thanks to James Miller, Philip Bloom and Den Lennie (and others!) I now have a new look to try out.
Great site by the way.
David.
We’ve used this technique to create our Light Leaks collection.
There is also FREE light leaks pack here: http://vegasaur.com/free-light-leaks
Feel free to use it in your projects!
Thanks Philip and James.
You inspired me and I’ve been using this technique a lot.
I am getting nice tilt shift effect and focus pull results, but am not getting many flares or leaks, even when shooting on sunny days, and I would like to. Any thoughts on what I should be doing to get more flares/leaks? Do you recommend setting the camera to Automatic mode or is there a particular setting that will yield better results?
I’m using the T4i and an old 50mm Pentax lens.
Also, on the ‘Plea’ videos above there’s a beautiful texture that looks like an overlay or filter – sort of saturated and smokey (almost like shooting through a veil). Would you kindly share on how to try and get this effect?
Many thanks in advance!
Hey Philip,
I’ve tried it out : http://www.youtube.com/watch?v=49w2mBBdqOs
thank you a lot, and i would love if you can give me some feedback..
Hey Phil, Great article!
If you’re interested, we have a set of free light leaks from our collections at LightLeakLove.com (http://lightleaklove.com/products/light-free) – it’s a sampler from our most popular Light Leak Collections. Hope you or your followers enjoy it 🙂
Cheers! Larissa@LightLeakLove