
(Vimeo version at the bottom of the post downloadable as ProRes Proxy)
My experience with Apple ProRes RAW (yes they write it in caps but it shouldn’t be!) are minimal. I have shot it once a while ago with the Sony FS5 for Ollie Kenchington’s “Mastering Colour” masterclass for MZed but I didn’t edit it.
My first time shooting properly and editing it was for the video that Atomos and Z Cam hired me to make for today’s launch. It was a learning experience but a pleasant one.

ProRes RAW is on a number of cameras already and that list is growing. Apart from the Sony FS5, FS700 and FS7 it is coming to the FX9 later this year, Nikon has it on the Z6 and Z7, and it is coming to the Panasonic S1H imminently.
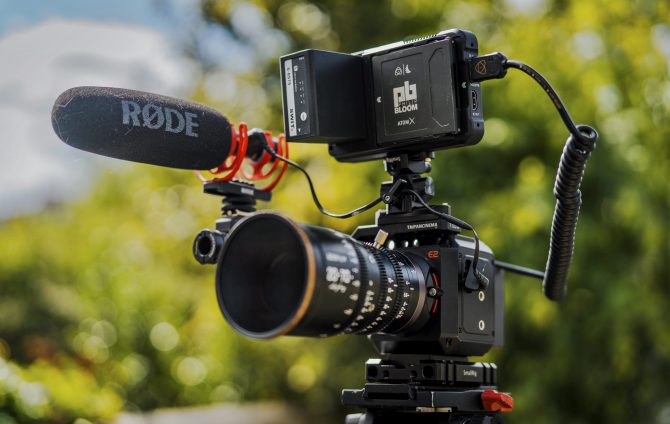
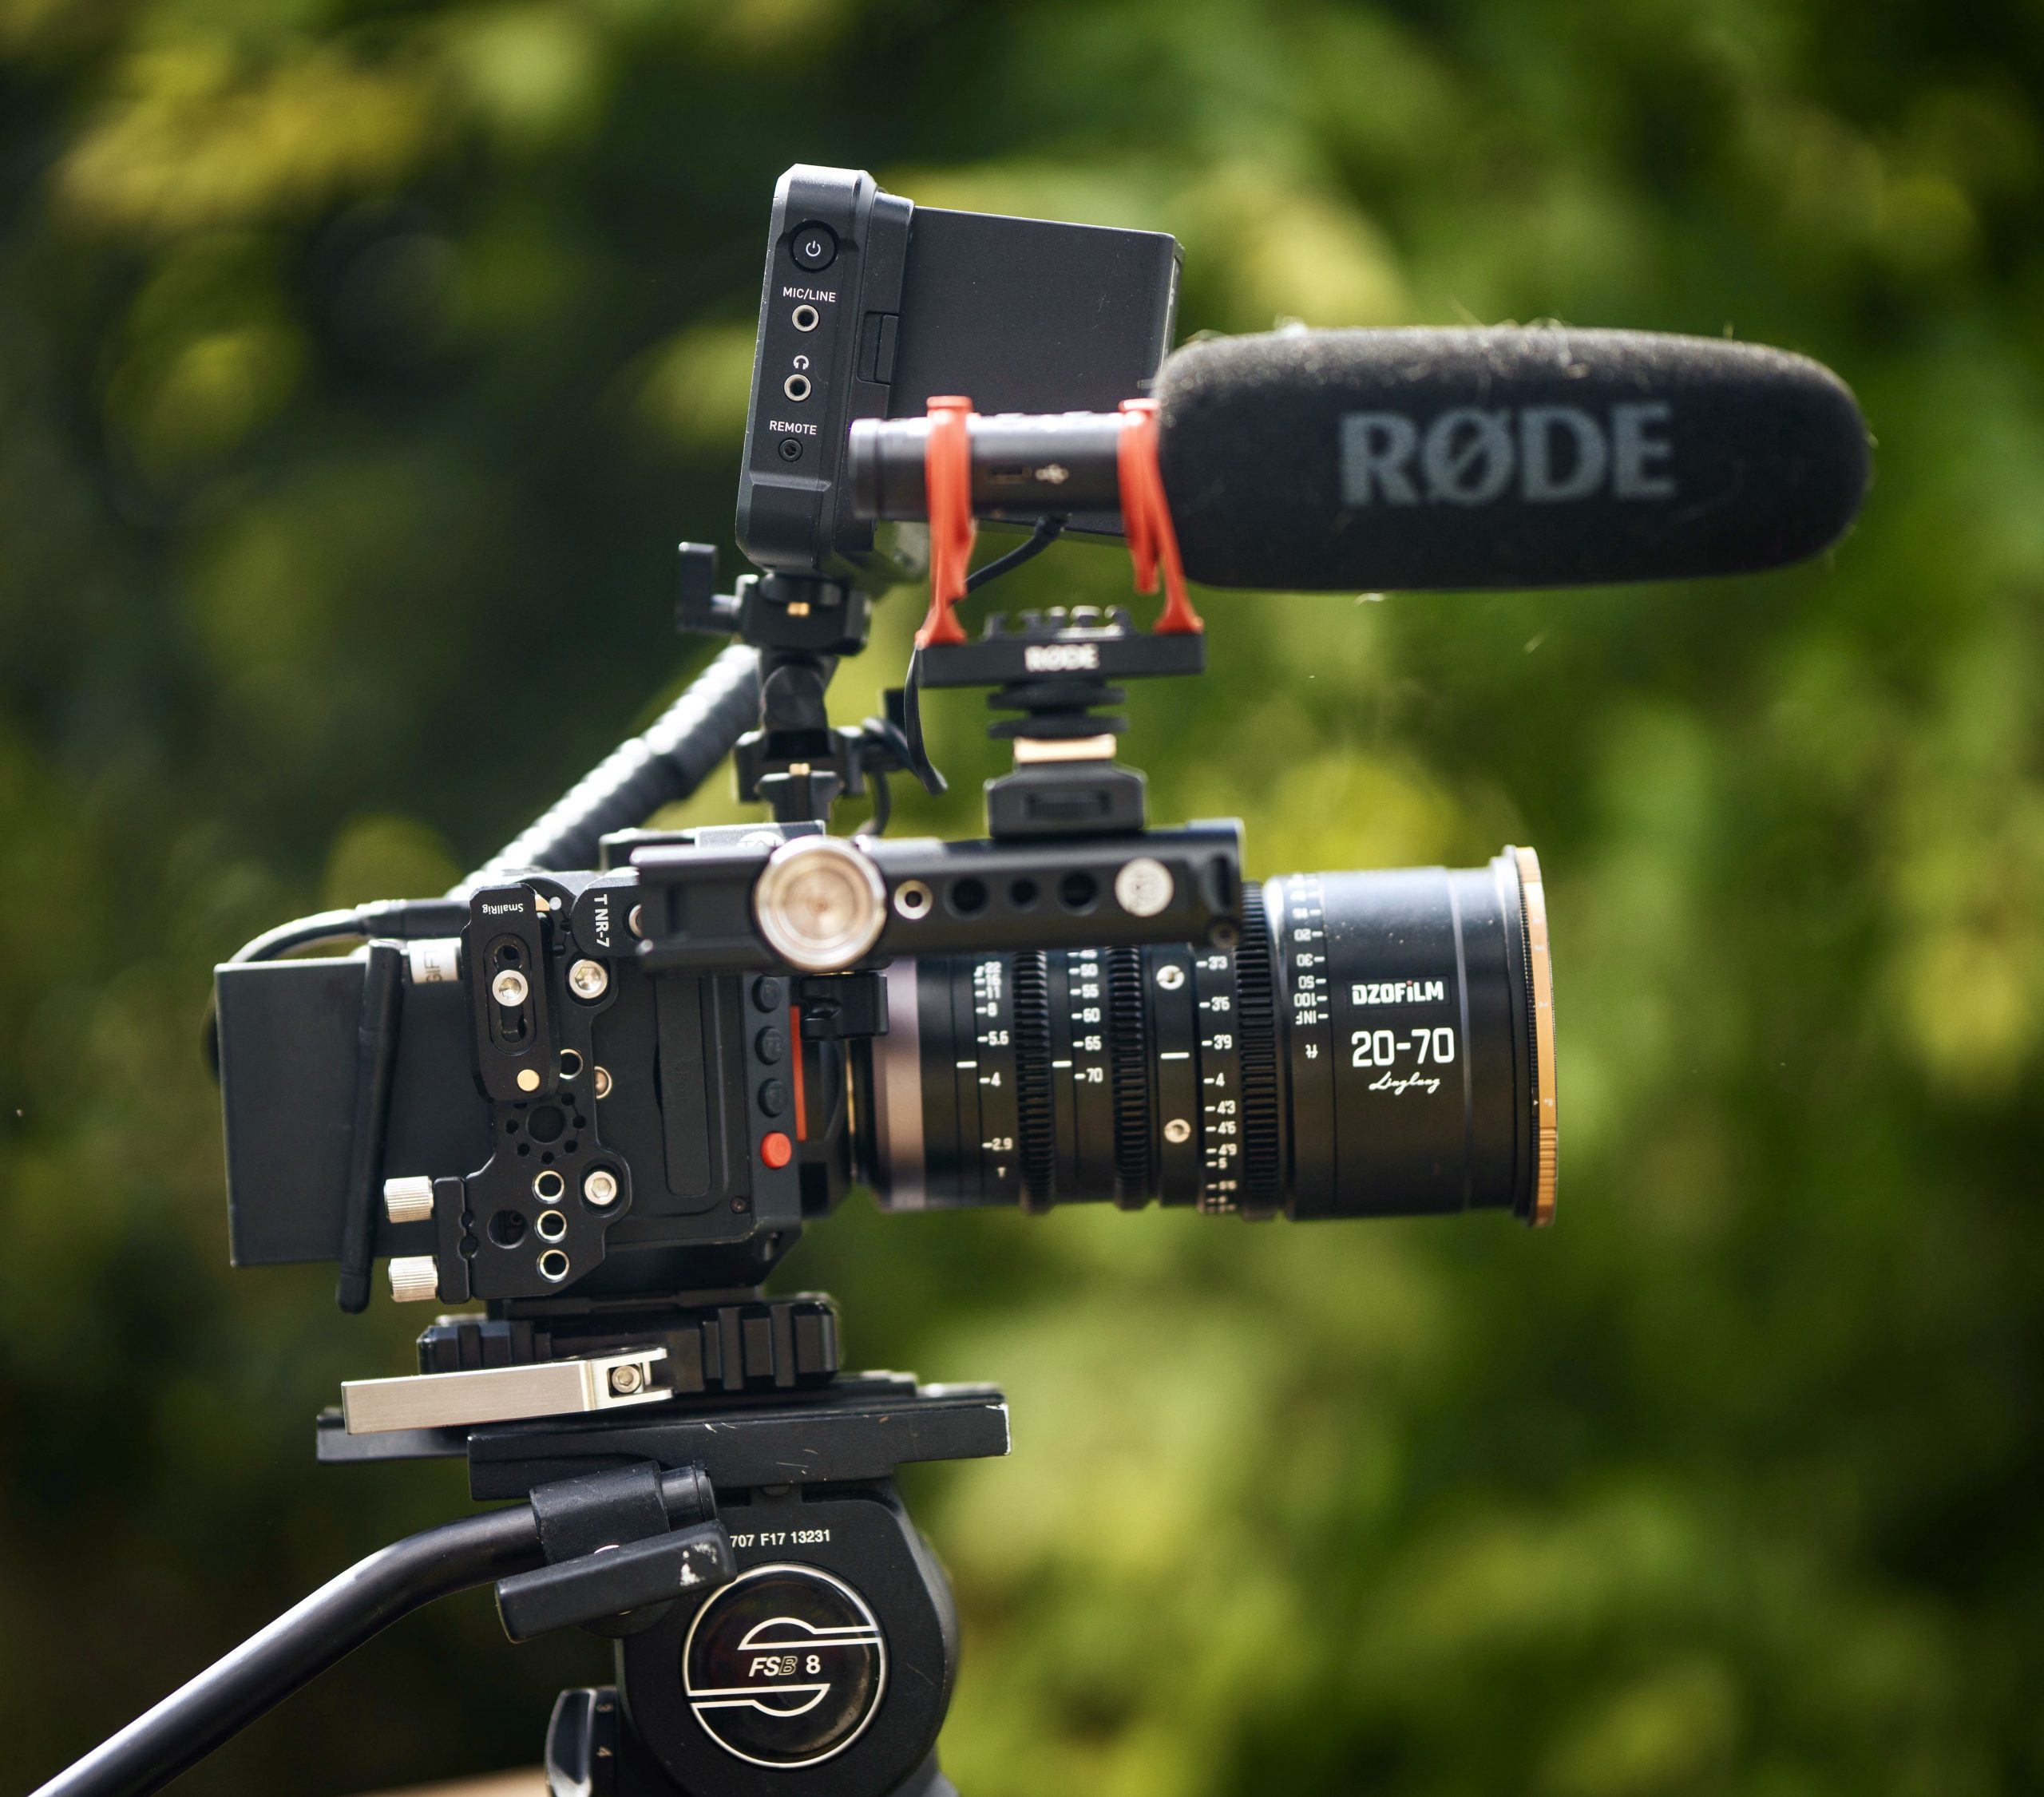
Z Cam is the latest to launch it and it is a welcome addition to an already very powerful budget cinema camera. I’ve owned this camera since late 2018 and the images from it as well as the specs are impressive. It is a micro four-thirds mount camera with a sensor that is apparently the same as the one in the Blackmagic Pocket Cinema Camera 4K. It already shoots in ProRes up to 4K 60p and is capable of up to 160fps in a letterboxed 4K in H265.
It is a very small camera and at just under $2000 a very affordable cinema camera. They also make a 6K S5 and full-frame version and a full-frame 8K model. So that’s a lot of very powerful cameras!
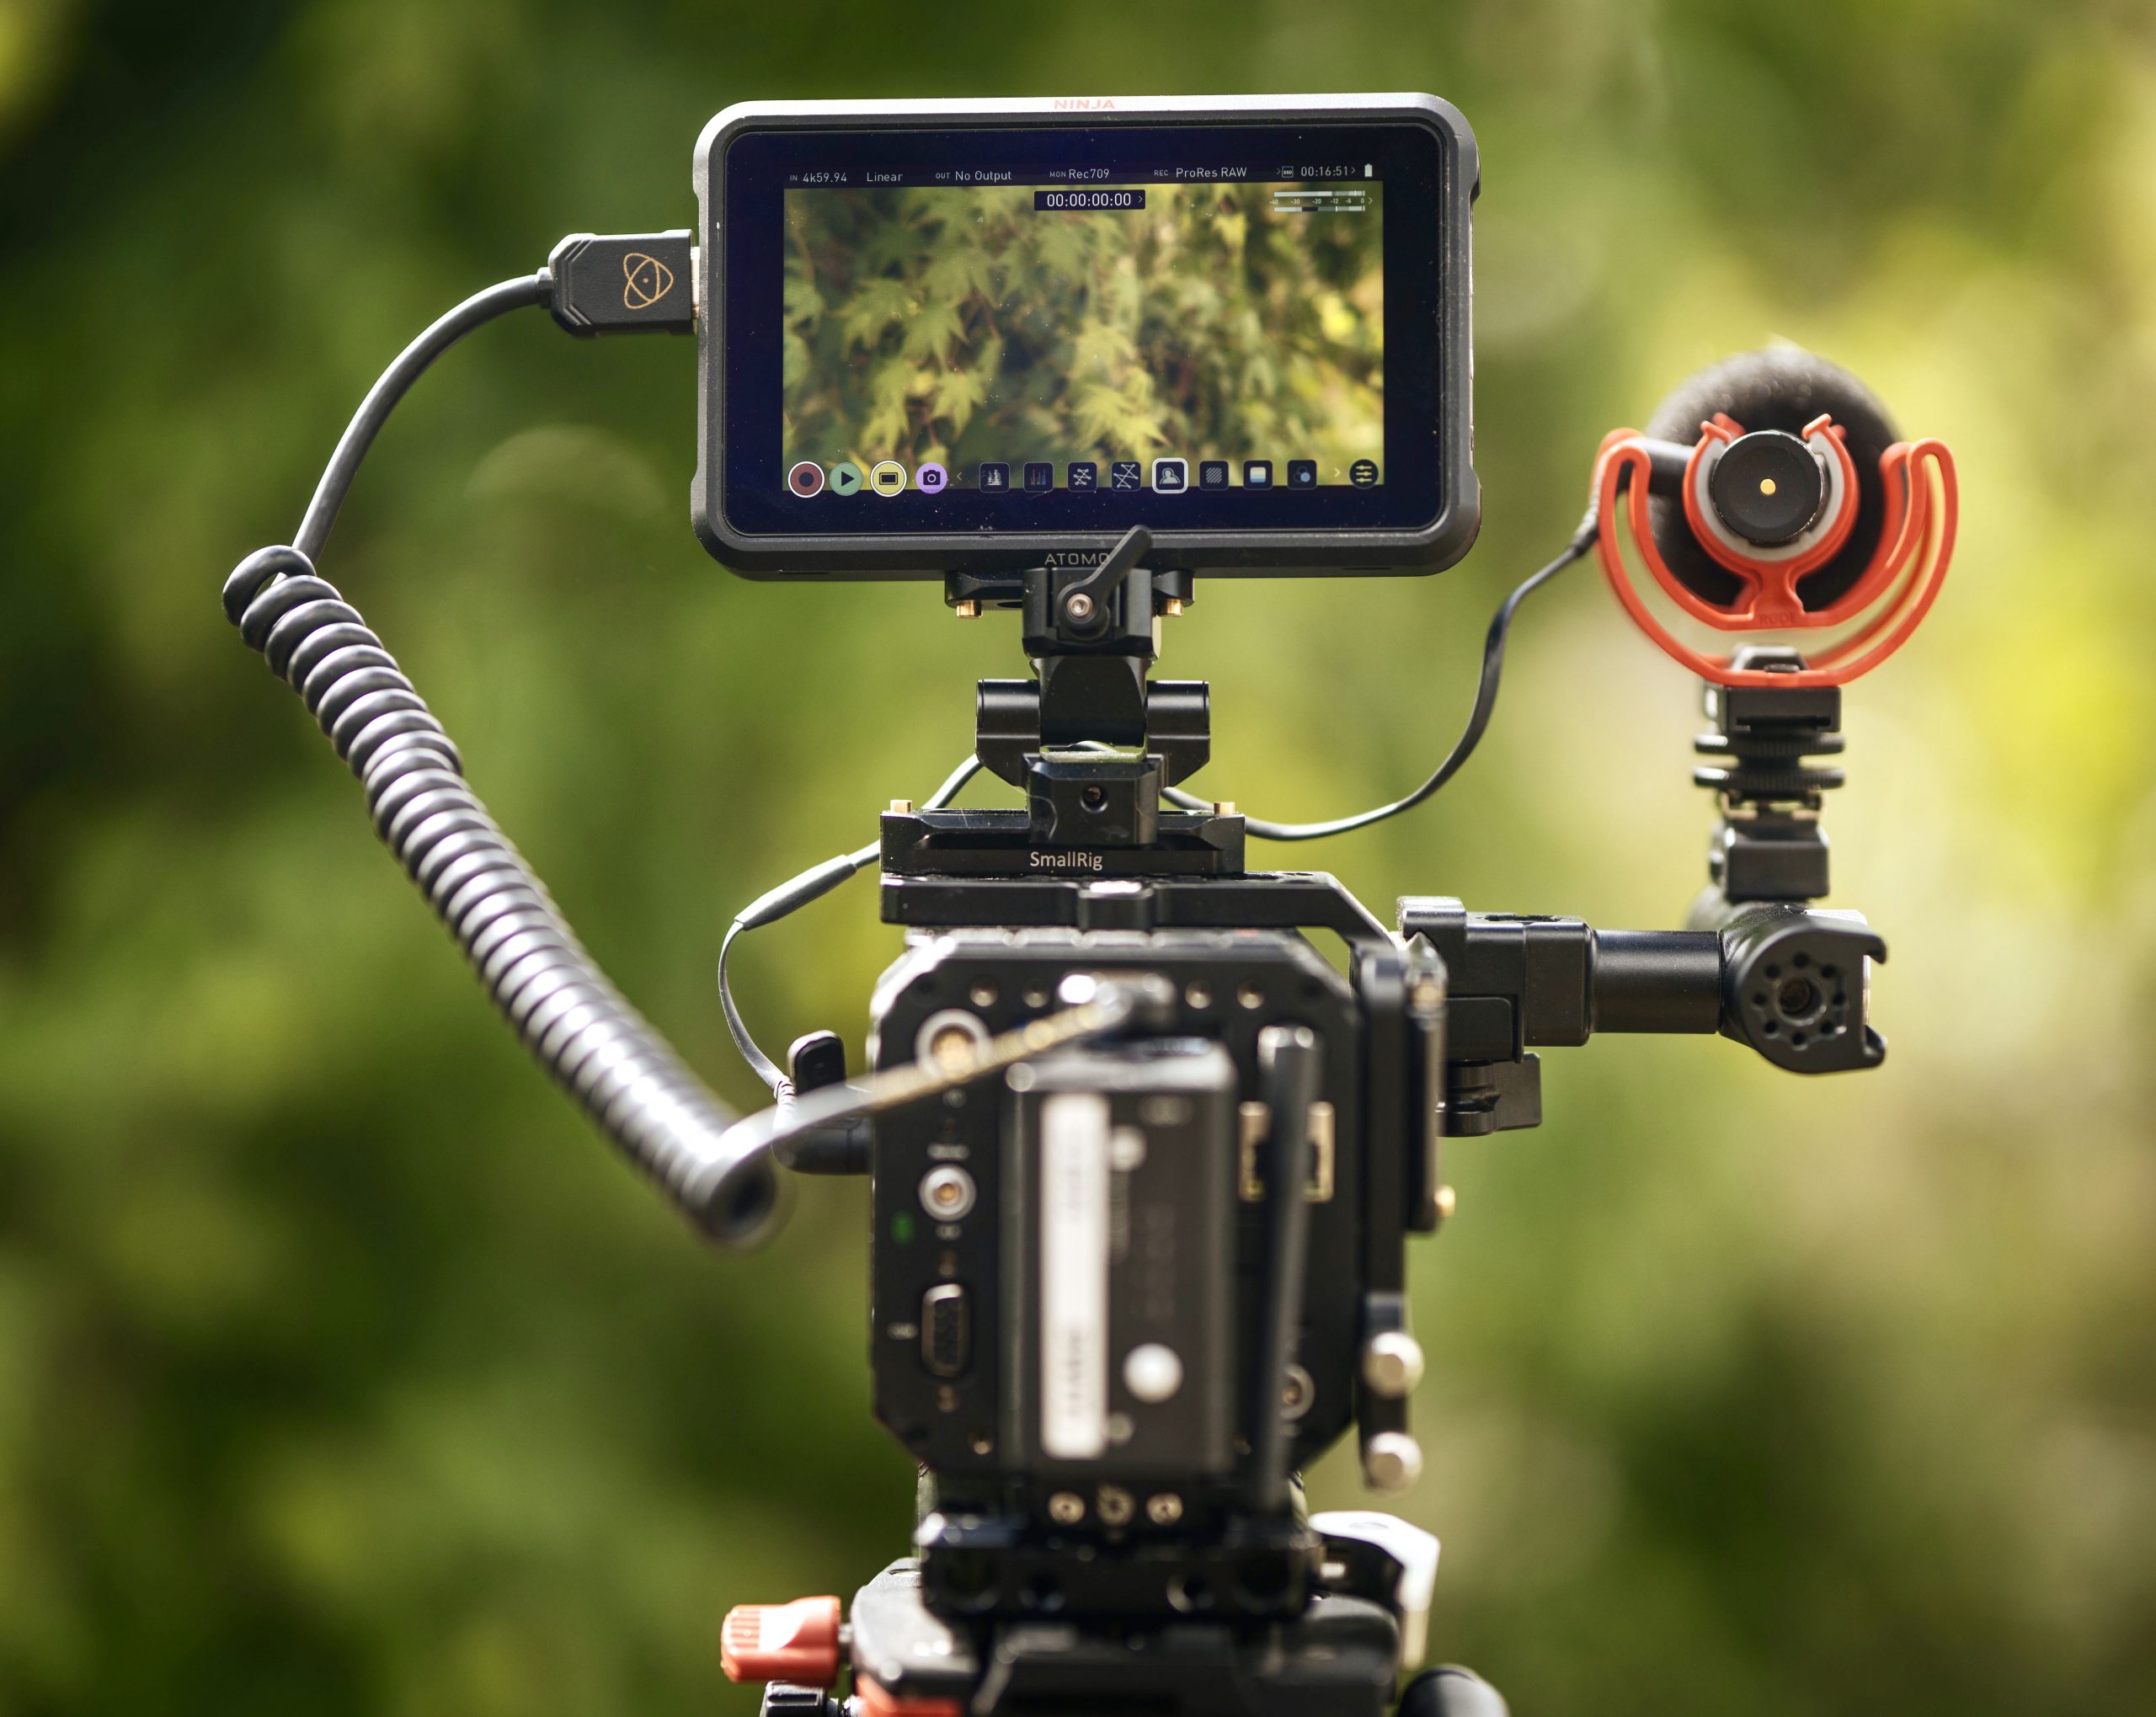
ProRes is a 10-bit codec and has been around for a long long time, it is solid, reliable and easy to edit. It isn’t the most efficient of codecs due to its age. ProRes RAW was announced in April 2018, it is 12-bit raw recording that is only available to record externally using compatible Atomos recorders. I have used the Atomos Shogun Inferno, Shogun 7 and the Ninja V to record it but you can also use the Sumo.
The main benefits of it are that you get the best possible image from the camera sensor, bypassing the in-camera processing to do all the debayering, demosaicing and processing in your edit software where you have full control of the image.
The other rather huge benefit is the files are not huge, unlike Cinema DNG for example. In fact, the normal ProRes RAW (there is an HQ mode) file sizes are less than the 10 bit ProRes HQ making this one of the most efficient proper raw codecs out there.
I edited this video in the BETA version of Adobe Premiere which right now is a little bit basic when it comes to the raw controls but it will get there. It works best in FCP X but I am just a bit too slow with that still so I opted for Premiere.
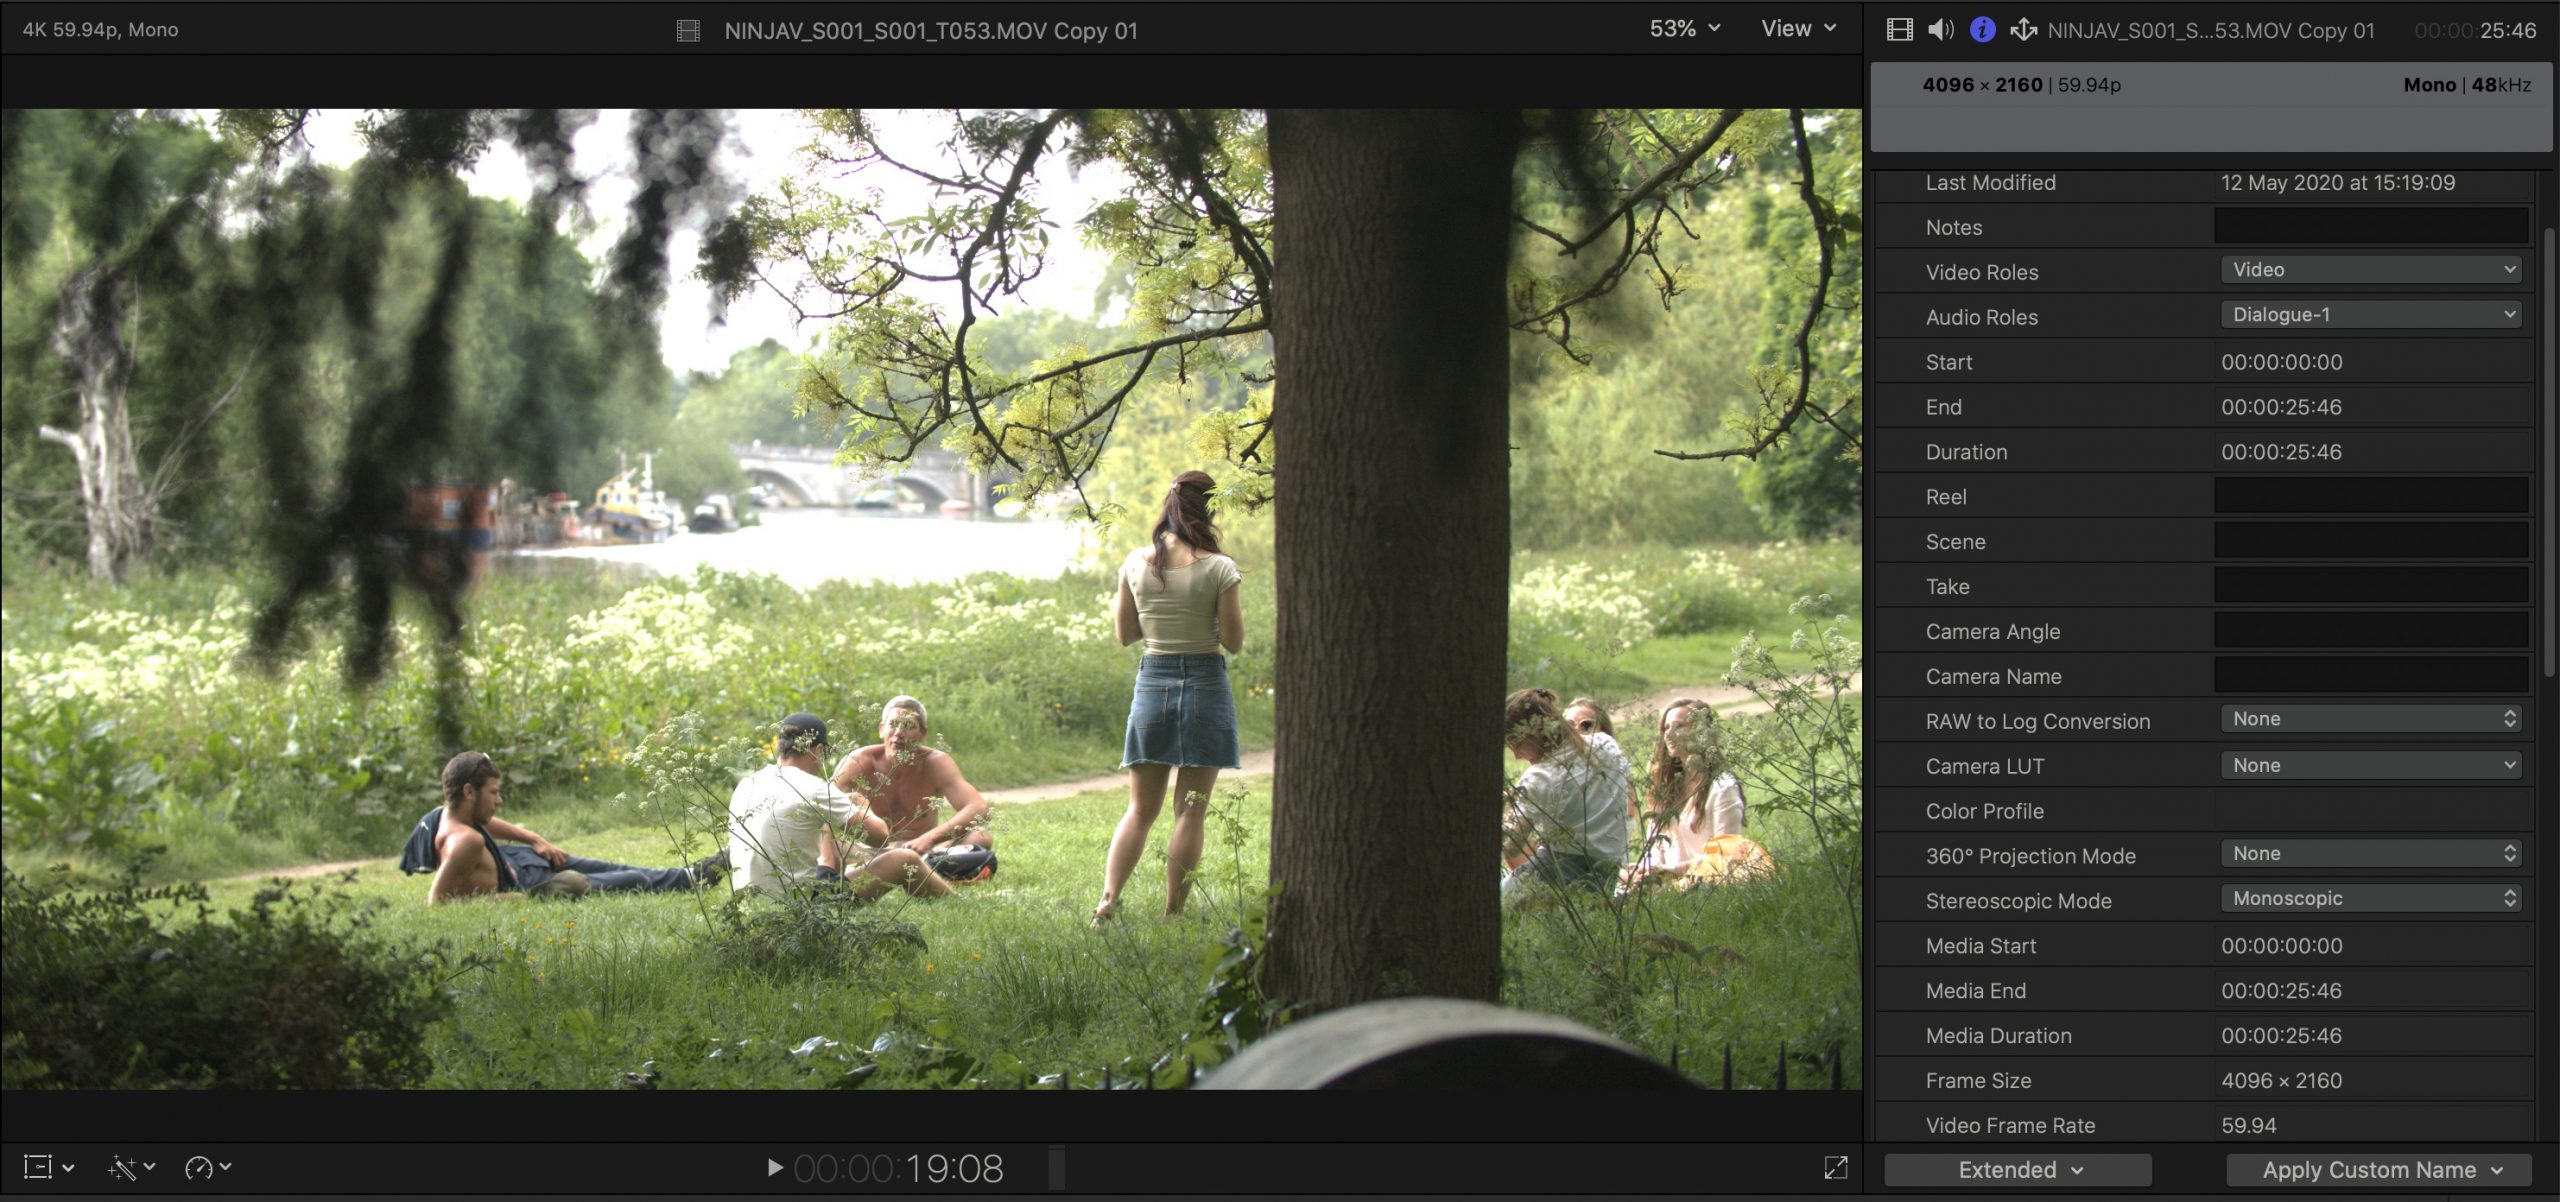
The key thing when shooting with this set up is to give the sensor lots of light, so much so that when you bring the image into the edit it looks really REALLY overexposed, but it isn’t. It is just how the software sees it. You do need to protect your highlights of course unless you want them to be blown out of course. When you are filming it looks normal on the Atomos screen, you just need to watch that waveform of course!
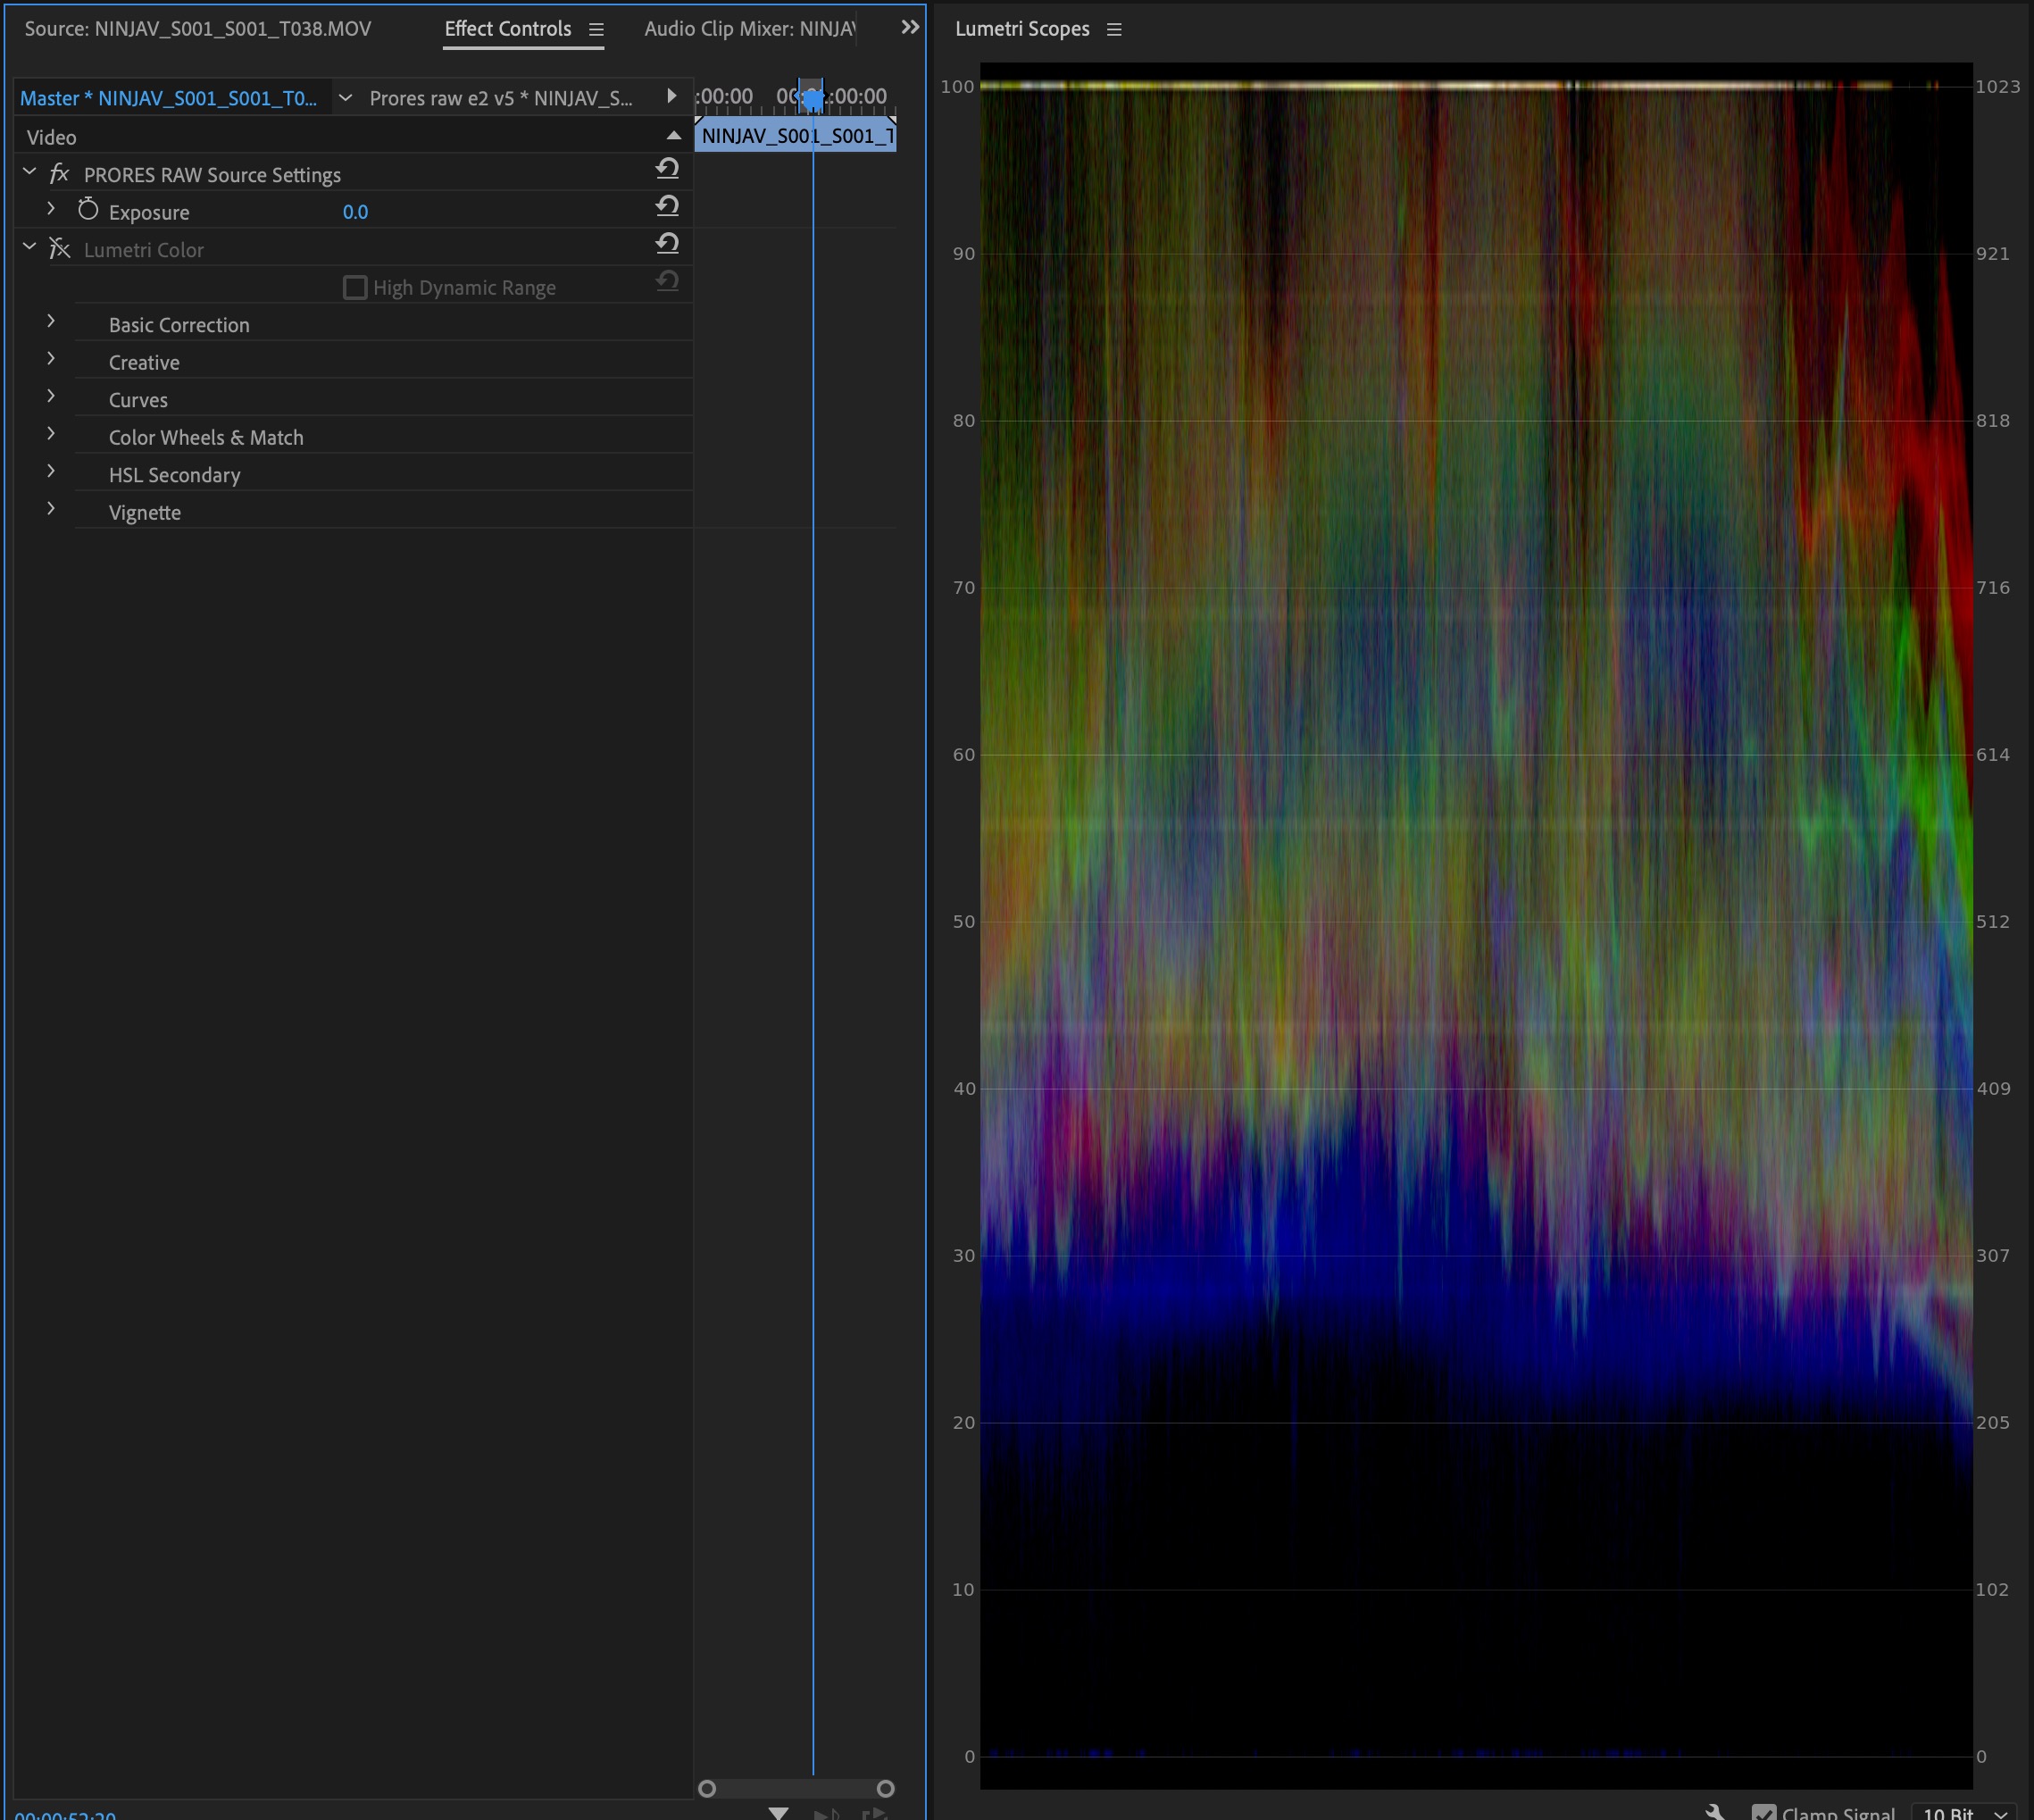
Then in Premiere under the effects tab on the master clip, you have an exposure slider, I brought it right down to get my highlights looking the best. It does, of course, make everything look underexposed but don’t worry!
You can see from the waveform the difference from bringing the clip in, to bringing the exposure down and all that info that is still there. There is some clipping still of course but almost everything is still there. 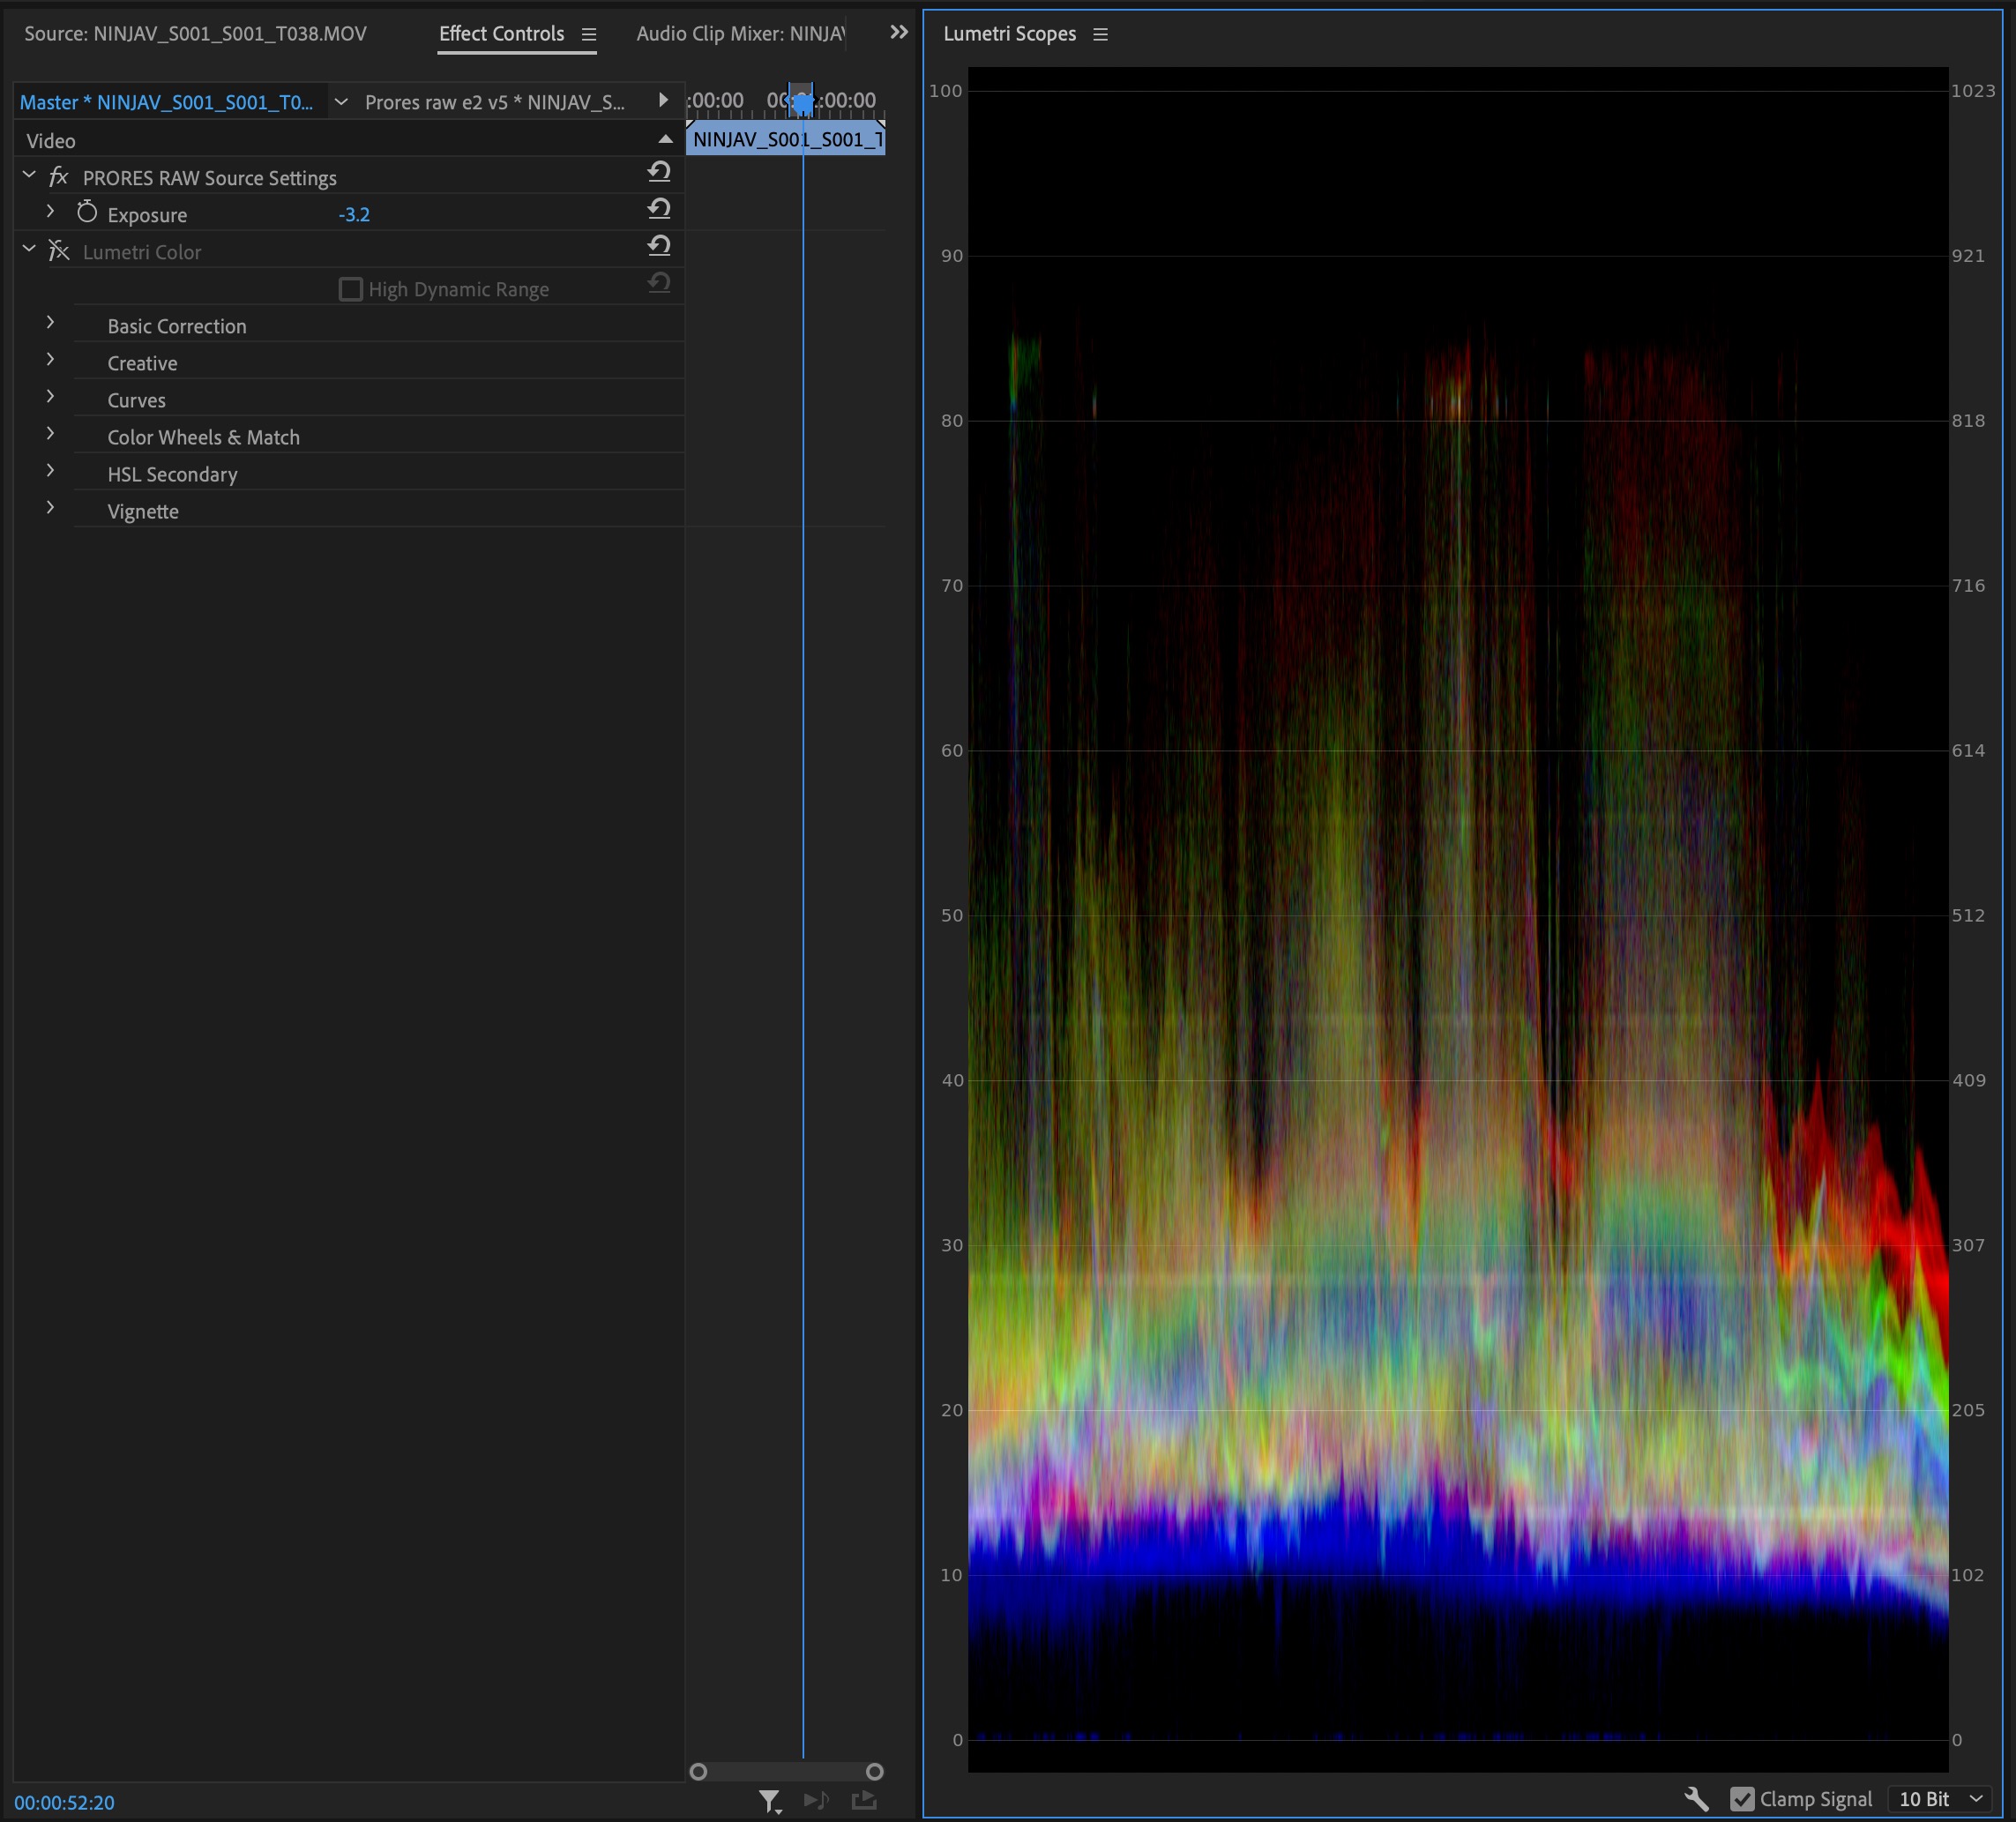
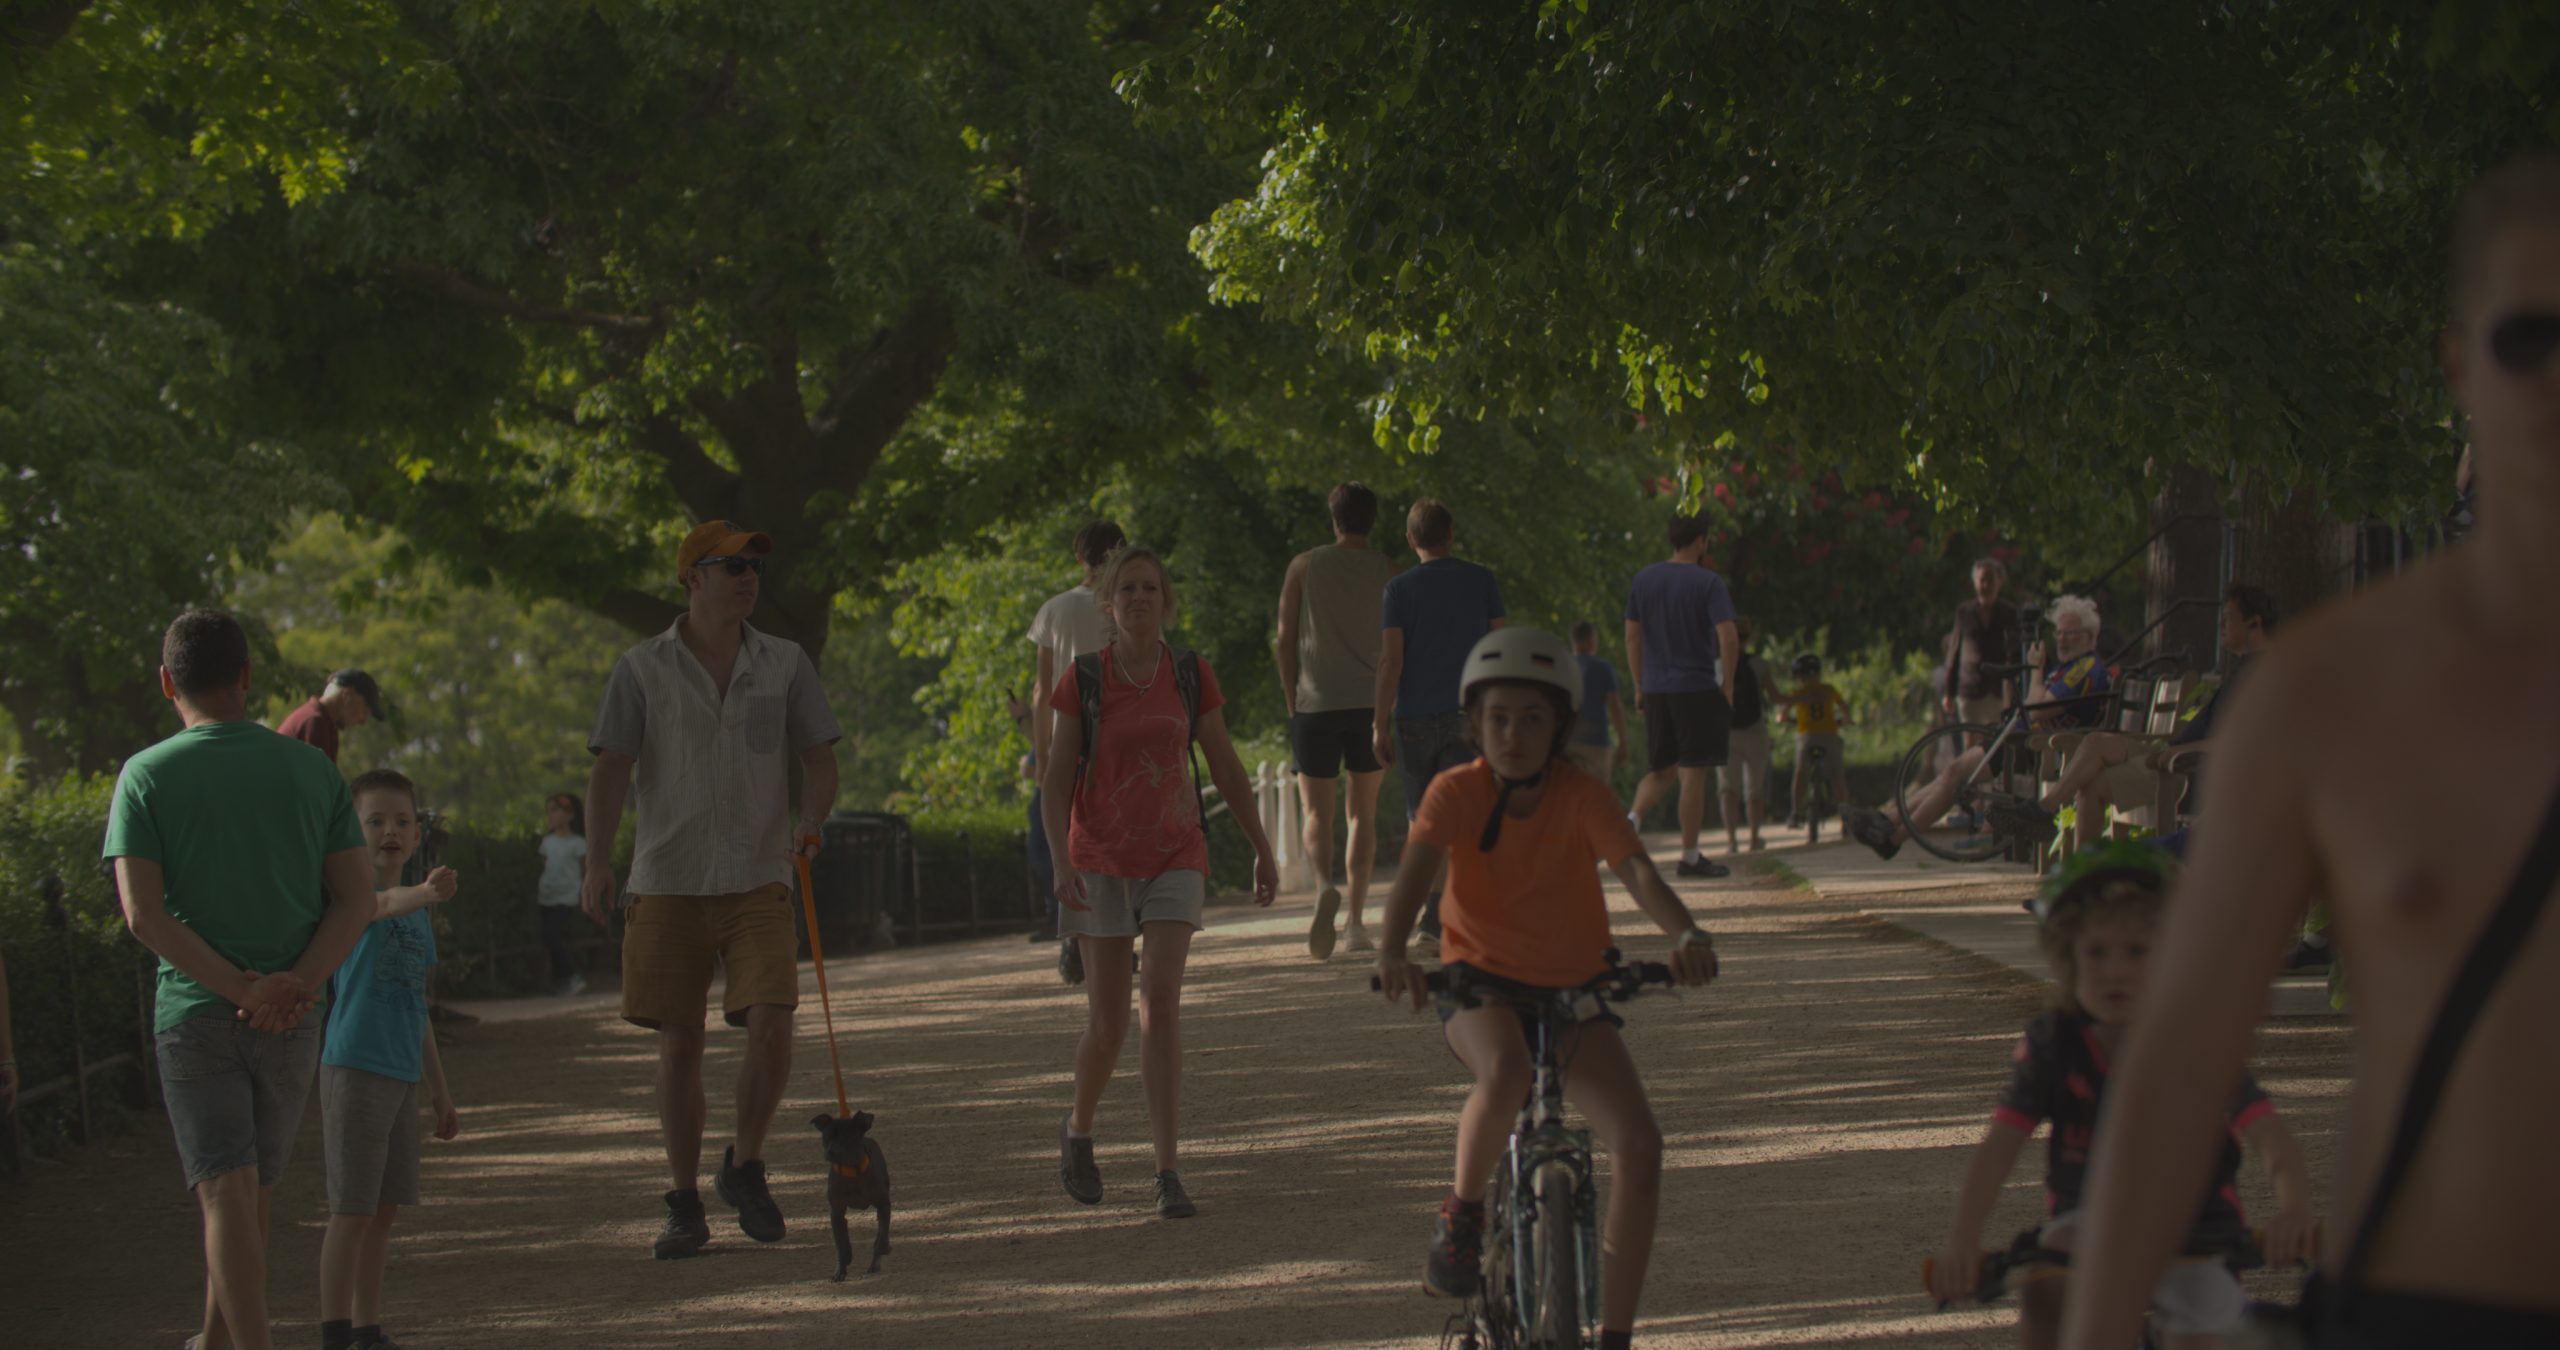
Then I fixed that in Lumetri and created a graded look. I do not know if the Lumetri panel is working on the metadata of the raw image or just working as usual. I am sure this will be clarified soon. Certainly, in my sequence settings, I am in ProRes raw editing mode so it is entirely possible that these are our raw controls but it is entirely possible that we only have the exposure slider currently…


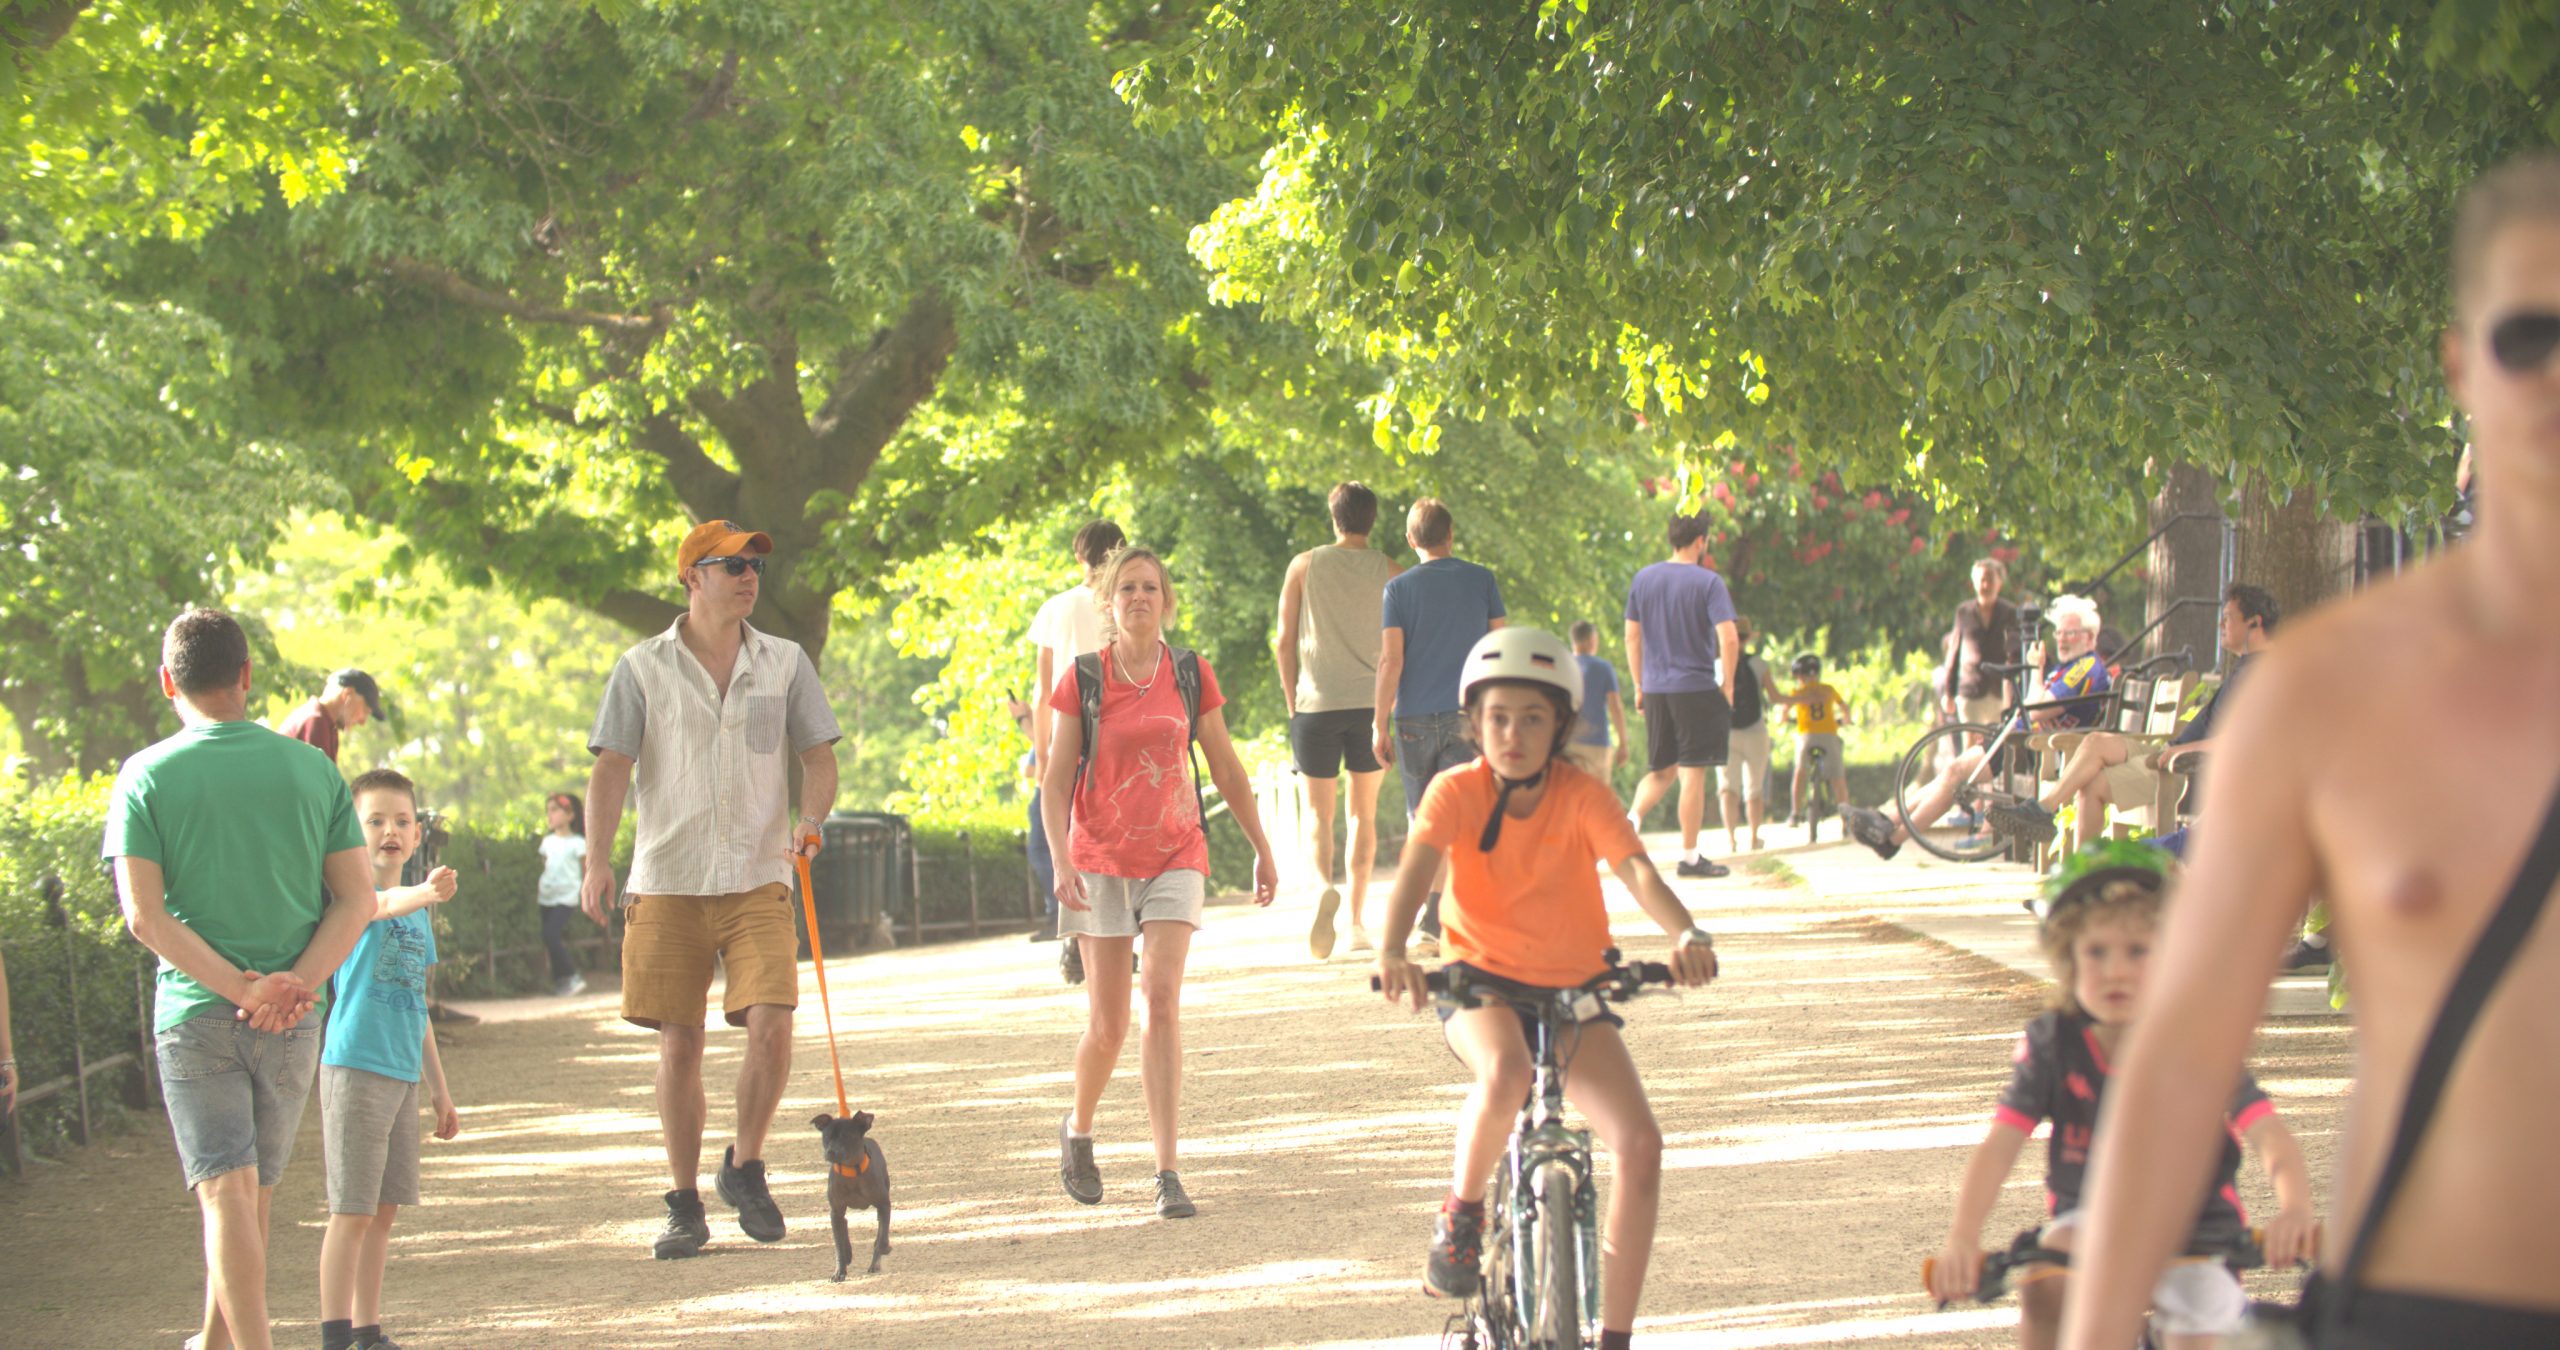
This was a very challenging shot for the dynamic range which is why I chose it as an example. Some highlights have to be clipped due to the strength of the sun coming in and the detail in the shade but I protected all the important highlights.
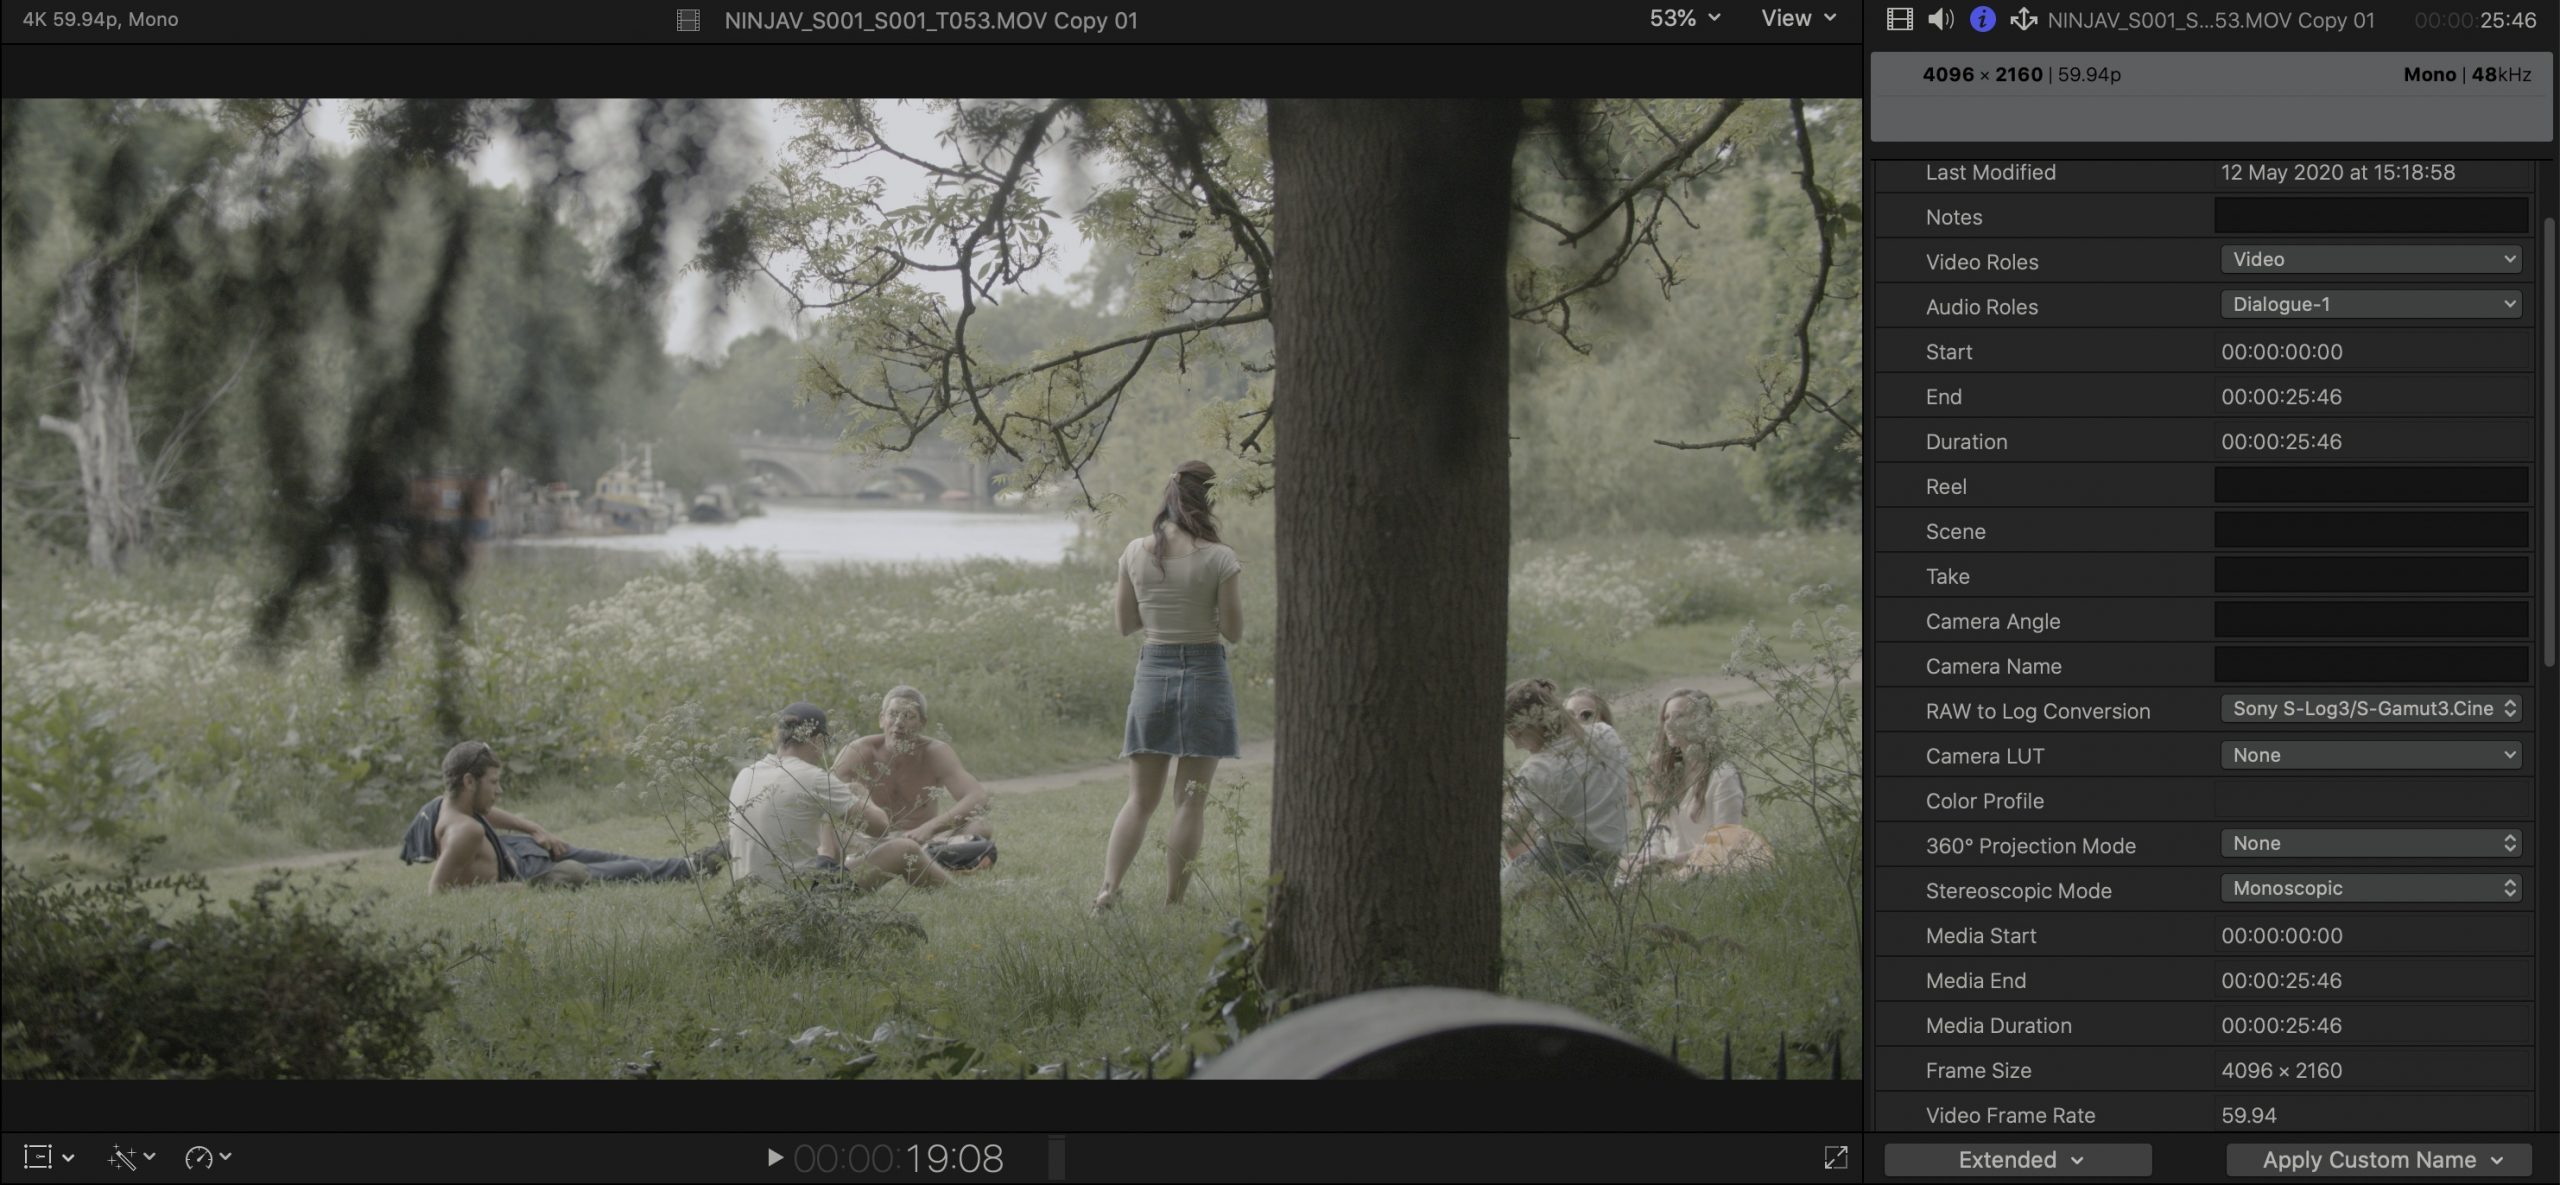
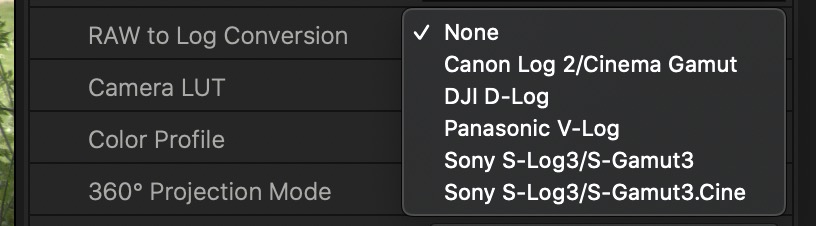
In FCP X you can do a raw to log conversion which makes working with it much more traditional. In the below image I applied the S Log 3 S Gamut 3 Cine conversion to it, but there are other options. This makes it much easier to use LUTs based on these log looks.
I shot the video in 4K DCI 60p which is the highest frame rate you can do currently in ProRes raw, it was then conformed to 25p.
Lenses used were the Canon 100-400mm II IS L, Canon 16-35mm F4 IS L, DXOFilm 20-70mm T2.9 native lens. I used the Metabones Speedbooster XL .64x EF to MFT adaptor for the Canon lenses. The Polar Pro Peter McKinnon Variable NDs REALLY impressed me. Normally when you use variable ND filters on long telephotos they go quite soft, not the case here at all.

I hope to be able to share a native clip for you to download here soon, just remember it was filmed with pre-release firmware on both and it is for personal use only! Take note Premium Beat!
The audio was mostly with the RØDE video mic NTG, which is fantastic! Additional audio was done as foley in post.
As for the film itself, it neatly slots into my series of films documenting my home part of London during this pandemic, seeing the changes during this time. I have made three films prior to this. One before lockdown, on the first day of lockdown and just over two weeks in. This new film was made on the 48th day of lockdown on the hottest day of the year which clearly made people come out and forget about the social distancing rules, hence the title “Distance”
Stay till the end for the little bit of audio that I recorded during one shot from a group of friends as this sums the whole thing up.
You can see the rest of the films at the bottom of this post.
You can pick up the gear I used here:
Buy the Z Cam E2 here: https://bit.ly/zcame2pb
Atomos Ninja V here: https://bhpho.to/2T6dPQs
Lenses used: Canon 100-400mm L II IS:
Canon 16-35mm F4 IS L: https://bit.ly/1635canonf4
Metabones XL .64x Speedbooster EF to MFT: https://bit.ly/metabonesxlrpb
DXOfilm 20-70mm T2.9 (Native)
RØDE Video Mic NTG: https://bit.ly/rodevmntgpb
Polar Pro Peter McKinnon Variable NDs 2-5 stops: https://bit.ly/pmvnd2to5 6-9 stops: https://bit.ly/pmvnd2to6
“Distance” Z Cam E2 & Atomos Ninja V w/ ProRes RAW from Philip Bloom on Vimeo.