


David Kong here, with my third post in this video/article series that is all about working with less gear, for less money, and making it look good.
This article/video is all about Magic Lantern and how it helps me get the most out of low-end DSLRs (in this case, the Canon T2i/550D). I’ll be going over the concepts behind Magic Lantern, a lot of questions that people have about it, and then I’ll be demonstrating live all of the features that I rely on in my films.
Part One: The Gear
The first video/article was all about the gear (lenses, filters, tripods, etc). If you haven’t seen it yet, check it out here:
Part Two: All about the Camera
The second video goes very in-depth with the DSLR – I cover everything you need to know about formats, codecs, and dynamic range in order to get the most cinematic images.
Part Three: Magic Lantern
The Proof of Concept:
I’m using one of my films as an illustration for all of these concepts, so if you haven’t seen the Portrait of Macerata, check it out here. I’ll be talking about that film all through this series.

First, what Magic Lantern isn’t: Magic Lantern is not a replacement for the firmware on your camera. It runs in addition. All of the normal Canon features stay right there, but Magic Lantern gives you some new ones.
Is it safe?
There are two kinds of Magic Lantern that you can install on your camera. You can install the current stable release, or the alpha software. The alpha is what’s currently being developed. People are trying out new things, experimenting with new features, playing around with stuff. It’s not polished, and it’s not fully tested. I personally would only recommend installing the alpha versions if you’re into techy stuff, and you understand what’s going on, and you’re willing to take more of a risk.
The current stable release has been tested, not as much as the actual Canon one, but it’s been tested by lots of people, and they’ve gotten rid of most of the bugs. It’s much safer.
There is an extremely remote possibility of Magic Lantern destroying your camera. Because the engineers are really figuring all of this stuff out by experimentation, it is possible that something could go wrong. But it’s extremely unlikely. If we’re talking about the stable release, thousands of people have installed it without any problems. Back when they were just discovering what Magic Lantern could do, there was only an alpha version, and it was buggy and caused problems with some cameras, but that’s not happening anymore.

Does it void my warranty?
Because Magic Lantern does not actually modify the hardware of the camera in any way, it does not void your normal Canon warranty. The Canon warranty stays exactly the same. However, if Magic Lantern breaks your camera, the Canon warranty will not cover that. But only if the problem was specifically caused by Magic Lantern. The normal Canon coverage stays the same.
Installation
There are three steps to installing Magic Lantern:
- Flip a switch in your Canon firmware that tells it to boot from the SD card (if possible).
- Set the boot flag on your SD card (which basically says, “I have software on me”).
- Copy the Magic Lantern files onto the SD card.
The only modification that you make to your Canon camera is to tell it to try to boot from the SD card if it sees the boot flag. Magic Lantern itself lives on the SD card. This is convenient because, if you want to shoot with the stock Canon firmware, all you have to do is format your SD card to remove Magic Lantern, or just swap to another SD card.
The only thing that you don’t want to do is to set the boot flag on the SD card but not copy the Magic Lantern files onto it. If you do that, the Canon firmware will try to run the SD card, but there won’t be any software to run, and it’ll freeze.
The official installation instructions from Magic Lantern are very good, so I’ll just link to them right here:
http://www.magiclantern.fm/install.html
Features
There are dozens of features, and I use many of them both for photo and video, but it’s far more than I can cover right here. I’m just going to focus on the particular features that I used for the Portrait of Macerata.
Help menu: If you press the info button any time you’re in the ML menu, it’ll bring up the ML user guide which helps explain what the different functions are.
Audio
One of the major features of Magic Lantern is that it allows you to record audio manually and also monitor it with headphones. I actually didn’t use that feature on this project because I didn’t record audio on this shoot.
Without magic lantern, you can’t monitor audio at all on this camera, but with Magic Lantern, you can monitor through USB.
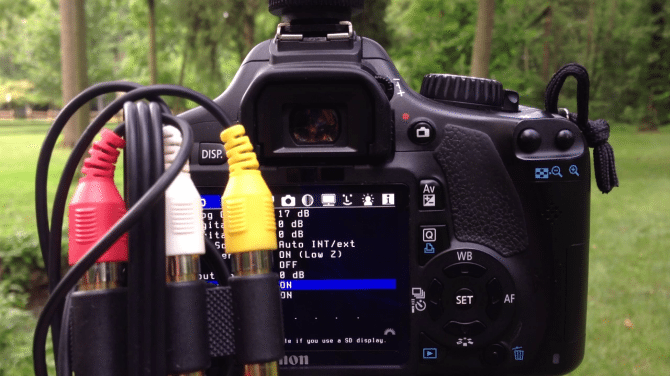
You’ll notice that I’m using a little cable adapter that allows me to monitor my audio from headphones through the USB port. Here’s the adapter that you’ll need for that (plus the A/V cable that comes with the camera). There are different versions (you’ll see I’m using a larger one in the video), but this is the smallest and most convenient one:
http://www.amazon.com/Monoprice-Plated-Stereo-Splitter-Adaptor/dp/B00DJAAFVW

Histograms
The histogram is one of the most important Magic Lantern features for me because it gives me solid, impartial information about what’s happening with my image. It’s very easy for the LCD to give you an incorrect impression of how you’re exposing, but the histogram never lies. If you’re fuzzy about how the histogram works, check out the video for an in-depth explanation.
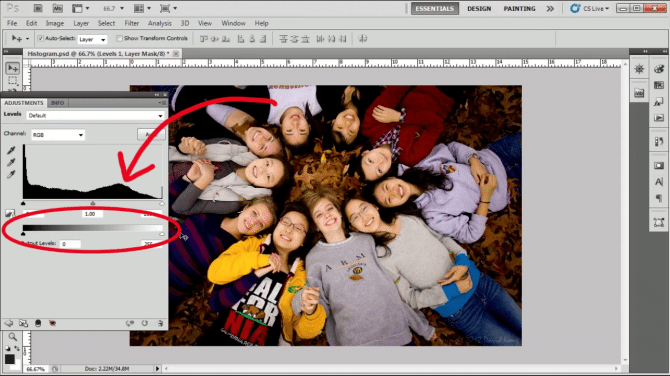
Some people prefer the waveform monitor, and that’s available too, of course.
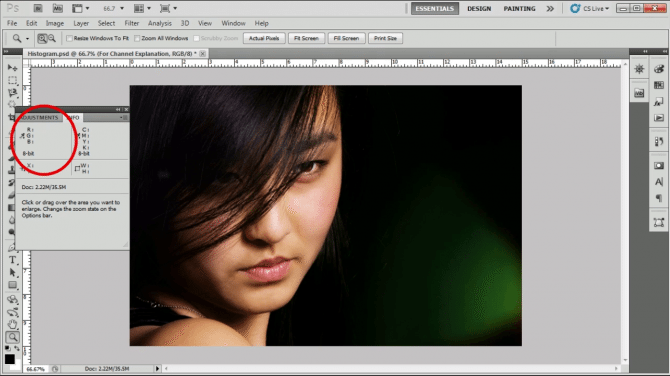
Channel-by-channel clipping warnings
One of the reasons why I prefer the histogram is because it gives you a really convenient clipping warning on a channel-by-channel basis, which is much more valuable than just zebras or the waveform. If you don’t understand why that matters, check out the video for a complete explanation.
Some more of my favorite features
Auto-style-switching
Shutter lock
Intervalometer for time-lapses
33 comments
Hey, thanks for a really inspiring serie. Have been waiting for part 3 to come out but it seems like the video is private on vimeo? Hope it will be fixed soon!
Sorry about that! It’s live now!
Part 3 is viewable and is a nice tutorial, a great series overall. I look forward to parts 4 & 5.
David, thank you for sharing all this info. It is really helpful for a newbie like me. Can you give us some hints about how you made the star trail scene at 5:33?
Yep, I will be covering the star trails in my post-production video, part 4.
David, you mentioned you get high quality audio when you use headphones to monitor audio. Whenever I use headphones with a Canon DSLR equipped with Magic Lantern, it always sounds distorted. I’ve tried to adjust the headphone volume, the gain settings, different cables and different cameras. Am I doing something wrong? Has anyone else had the same problem?
Hmm. I’ve not come across this issue before. What model is your camera?
I have a T2i. I also tried monitoring audio with my friend’s 60D.
Are you using quality headphones? Also, does the audio sound correct when you listen to the clips on a computer? (In other words, are you sure it’s not a problem with your microphone?)
By the way, thank you for all the work you put into these videos.
Outstanding series, David!
Thank you.
I have a Canon 7D and am thinking about installing Magic Lantern. I noticed that for the 7D, it’s still in alpha.
Do you have any warning or recommendations? Also, where can I find the most reliable download?
-Patrick
This thread (it’s very long, go to the last few pages for the latest information) should give you a good idea of the current state of the 7D Magic Lantern version.
http://www.magiclantern.fm/forum/index.php?topic=3974.1325
Like I said in the video, it’s up to you if you want to take the risk and install a non-stable version. You should probably expect some bugs, and there’s a higher likelihood of something going wrong, but some people just want to live on the edge 🙂
Hey David,
Just to let you know how much I appreciate and how much I’m enjoying this series.
The previous episode answered lots of technical questions I had about compression and formats in a way that was easy to grasp, and the third one was great to make some choices about Magic Lantern which I’m using for a while now, but still was kinda confused about some of the features. Also, great visual explanation of the histogram! I don’t think I’ve ever seen it explained that way, and it is something lots of people has trouble with… that and curves.
I’m recommending it to everyone I know, despite the language barrier (I’m brazilian).
Keep it up, and thanks again!
Thank you for the great series. Very educational. I have one question about the codec. I just moved from a T2i to a 70D. Now I have the option to record in All-I frames or IPB. The file size for All-I frames are much larger and are advertised to be easier to edit, but do the larger files translate to a better image? I can’t find a lot of information on the topic. Any insight would be greatly appreciated. Thank you.
Kevin
Definitely go for the All-I frames codec if you want the highest quality. It will be easier to edit (because it will take less processing power to decode) and it will also give you higher image quality. The main technical difference is that the IPB uses long-GOP compression, while the All-I frame does not use long-GOP.
For more info on this concept check out the “Interframe compression” heading on this page as well as the headings below it: http://documentation.apple.com/en/finalcutpro/usermanual/index.html#chapter=C%26section=12%26tasks=true
The wikipedia page is a bit more technical, but also relevant: http://en.wikipedia.org/wiki/Inter_frame
Fantastic stuff David, thank you for sharing this with us. Look forward to the rest of the “Working with Less”
Hi David,
first, a great series you did. Thanks for that. But to be honest I was kind of disapointed by part 3. I thought you would show how you did “the Portrait of Macerata” using Magic Lantern. E.g. what settings you used etc. But it turned out to be a overview of ML you can find tons of on the Internet. (except for the historam, thet was realy the best I´ve ever seen)
I hope part 4 will be more about how you achieved that great look in “the Portrait of Macerata”.
Buka
i missed info about the “focus peak”. I think its one of the best features.
Yes, focus peaking is a great feature in Magic Lantern, though I decided not to spend much time on it partly because it’s covered very well elsewhere and also because I didn’t use it much on the Portrait of Macerata video, and I wanted to concentrate on that video (since this whole series is about that video).
Hello Buka, I’m sorry you didn’t find what you were looking for in this video, but did you watch part two? Most of the specific tips about how I used the camera were covered in that video.
Could you tell me more specifically what you’re looking for? It’s difficult to say exactly what settings I used, because I’m usually changing those settings constantly as I shoot. My aperture and shutter speed varied widely. I used the Cinestyle preset as I mentioned in part 2, and I shot in 1080P 24 frames per second.
The only Magic Lantern features that I used in the Portrait of Macerata video were the ones that I covered in this video: mainly just the monitoring functions.
Dear David,
Thank you very much for your series. I am about to make a small documentary in Italy myself. I was actually looking for a new camera to replace my 550d to use for this job. Then i say you’re first blog on Philip Bloom’s site and the portrait of Macerata. At first i was blown away by the quality of your portret, wow!!!
The timing couldn’t have been better, and the coincidence that you also shot in Italy. It felt like a sign to me which said:”keep you’re 550d and go out and shoot” like you showed. To my wife i speak of you as my Hero! Thank you so much David for sharing.
I wish you were living in my neighbourhood because i got so many questions.
A thing i still don’t quite understand is the use of the polarized filter. When filming outside i have problems with how to setup my camera without blowing out the highlights in the sky. I use a fader ND filter, but that doesn’t always solve the problem. When i darken the sky i also darken my subject that i want to film. I find it difficult to find the right balance. Does a polarized filter solve that problem?
Another question, did you ask for permission to film the city of Macerata?
Looking forward to the following parts. But i understand fully that it takes time to make these instruction video’s. Kind regards.
I’m glad it’s been helpful!
A fader ND is not the same thing as a polarizer. They serve different purposes – as you’ve noticed, a fader ND reduces the brightness of the entire image, while a polarizer only reduces a particular angle of light, depending on how you rotate it. So if you do it correctly (and if the conditions are right), you can end up darkening only a particular portion of your image.
I did not ask for permission to film in Macerata when I was on the public streets and the countryside. I did ask permission when I went inside of a private building, however.
Hey David, thanks so much for posting this series – so so useful.
Is your update on how to build the servo for the motorised slider still coming up soon? As soon as I saw Part 1 I bought the exact slider you mentioned off Amazon and am really keen to get it working with the motorised servo set up you spoke about!
Thanks so much again and hope to see the update soon!
I apologize for the long delay. It’ll be done within two weeks, but before then I can’t promise :/
No need to apologise! Just wanted to check that it is indeed in the works, and to let you know your work on it is much appreciated.
Hi, Thanks for the video, it was really helpful. I was particularly interested in the talk about codecs. However I use a Panasonic GH3 and I am confused at what codec it uses. Would you mind helping me out, and maybe guiding me in the right place of where I can find more info on it’s codec?
Thanks again
My apologies for the response – I missed this one somehow. Here are a couple good resources for the codecs available on the GH3:
http://www.eoshd.com/content/9011/the-panasonic-gh3-is-here
https://vimeo.com/58083957
Hey again David, any news regards to the slider motor set up? I’m heading to China to shoot some stuff of my own in the next few weeks and I would love to get this work as soon as possible. If you’re too busy to get the video out (which I’m guessing you have been, and understood, no problem), at this stage even a quick parts list would do the trick? I can probably figure it out from there… it’s either your solution, which is a super cheap price and looks amazing, or some kind of Konova slider set up etc… hundreds and hundreds of dollars I don’t want (or need) to spend! If there’s any information you can post about it in the next week or so, you would be doing me (and anyone else who is keen on your heels to get this thing up and running, maybe I’m not the only one) an enormous favour. Thanks again for the great work you’ve done here!
Hi David! First, I loved your videos and tutorials. Thanks for the informative tips. I’m also traveling soon and wanted to try a setup similar to yours. If the video isn’t finished, please post a list of items you used to build the servo system. That would be so helpful as I am putting together my own system. Any information appreciated. Thanks!
Hey guys, I’m sorry it’s taken me so long to get this video done, but in the meantime here’s a list of the parts I used:
http://www.servocity.com/html/hs-5485hb_servo.html
http://www.amazon.com/4AA-Battery-Holder-Wires-Switch/dp/B003YD8DQ8/
http://www.amazon.com/ELECTRONIC-MODEL-SYSTEMS-EMO1003-Driver/dp/B0027VDDQI
http://www.servocity.com/html/vertical_aluminum_mount.html
http://www.servocity.com/html/hitec_pulley_56314.html
http://www.servocity.com/html/6__servo_extensions.html
Legend. Thank you…!
One small thing that Magic Lantern does do (and I think was a an oversight by Canon) is a remote filming start stop.
It makes a lot of things so much easier.
Starting & stopping when your camera is on a crane or even when it is on a shoulder rig.