


David Kong here, with my fifth and final post in this video/article series that is all about working with less gear, for less money, and making it look good. You’ll find the first four videos embedded at the bottom of this post.
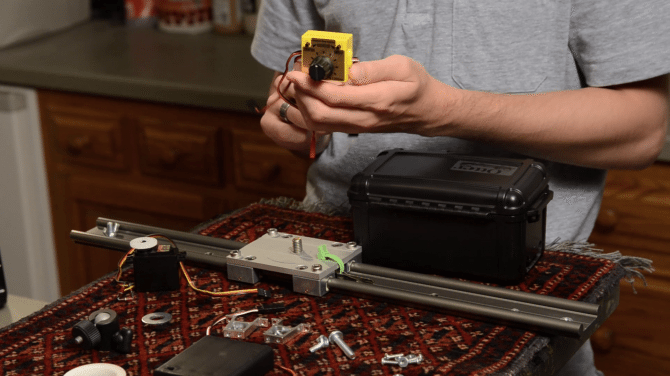
In this video, I give an in-depth tutorial on how to build the custom motorized slider that I use. If you want to see it in action, check out my video A Portrait of Macerata, below. All of the sliding shots and well as the two crane shots were taken using this slider.
This video teaches you step-by-step how to build this slider from the basic components. I’m not discussing techniques for using the slider in this video, because I already covered that in part 1 (at the bottom of this post).
Now, I love this slider and use it all the time, but I want you to understand what it’s good and and what it’s not good at before you start building it. It’s not perfect, and I’d definitely recommend using a different slider for certain situations.
The pros:
- It’s very cheap (about $175, altogether).
- It’s extremely durable. This setup uses no ball bearings, no belts or gears or pulleys. There’s nothing that can get knocked out of alignment if you drop the slider. The servo is housed in an extremely durable OtterBox. I could easily drop this slider on solid concrete (without the camera attached!) and not be worried about it breaking. It’s that solid. It’s just a single piece of metal.
- It’s light, compared to most motorized sliders, especially if you cut it down short, like I did for my “travel size.”
- It can run on a very light and flimsy tripod. The servo control box is connected to the slider by a wire, so your hands are never actually contacting the slider when it’s running. That means there’s no danger of bumping the slider and making it wobble.
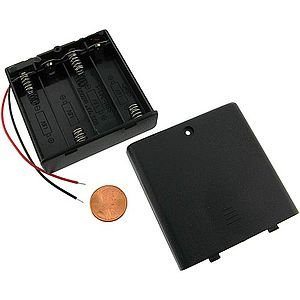
- The batteries last for ages. I’ve not actually tested how long it’ll run, but it’ll go for days or weeks on a set of 4 AA batteries, depending on how much you use it. Also, since it runs on AAs, replacements are always readily available in a pinch.
- You can get the rail in different lengths, cheaply. Since it’s a single piece of metal, you can just cut it into pieces with a hack saw if you want a custom length. That’s what I did for the Portrait of Macerata video. I have a 3-foot version and a 2-foot version, and I can swap the motor between them in a few seconds.
- The design is modular. This design can easily be adapted to different sliders, since it doesn’t depend on a belt system. All you need is some way to mount the motor onto the slider, and it’ll work. You could even create a mount that allows you to swap from one slider to another with just a couple screws.
The cons:
- It’s loud. This is a very big con. This basically means you cannot record audio while using the slider. No dialogue, no interviews.
- You can only move one direction at a time. Reset takes about 5 seconds, but you can’t record continuously in both directions. You have to stop the slider and pull the camera back to the other end manually.
- It’s not the greatest slider for hand operation (assuming you’re using the cheap Igus rail like I am). The Igus rail is perfect for a motorized slider, but it’s not perfect for operating by hand because it can be a little bit sticky. Sticky is actually better for the servo because it gives you better control, but it’s not as good for hand-operation.
- It can’t handle a big camera. The servo I’m using isn’t strong enough to pull a very large camera. That being said, you can upgrade to a larger servo for heavier cameras, but I don’t have much experience with those servos.
The Components
Most of these components are available from many different suppliers, but I’m giving you links to the places where I purchased them.
First off, you need a battery tray. You have a couple different options for this one. You need 4 AAs and you need them to attach to a servo cable. Unfortunately, if you want an on-off switch on the batter tray, you’ll have to solder the cable on manually. If you’re able to solder a couple wires together (or know someone who can), I’d recommend buying the tray that comes with a switch along with a servo cable and soldering them together yourself.
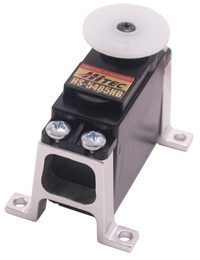
The servo. There are different options for different strengths, but this is the one I ended up with. It’s a nice compromise of strength and price, and it does the job well. Make sure that you get it modified for continuous rotation! It will NOT WORK unless you do that.
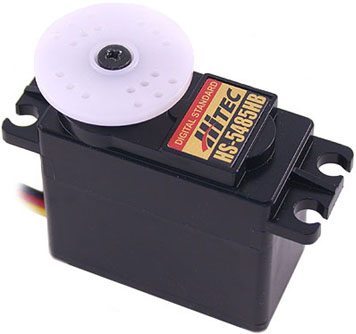
http://www.servocity.com/html/hs-5485hb_servo.html
The driver. The cheapest and simplest driver is this one. It has a handy “center” button that I mention in the video that lets you freeze the slider quickly.
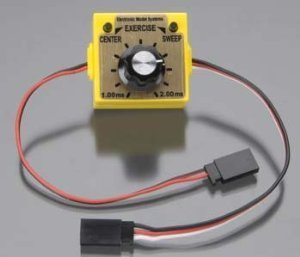
http://www.amazon.com/ELECTRONIC-MODEL-SYSTEMS-EMO1003-Driver/dp/B0027VDDQI
The mount. This allows you to attach the servo securely onto a mounting bracket, or in my case, onto the OtterBox.
http://www.servocity.com/html/vertical_aluminum_mount.html
The pulley. This is what you use to wind up the cable (in my case, fishing line) that draws the slider toward the servo.
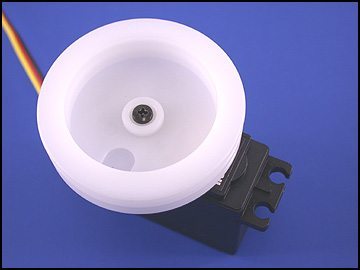
http://www.servocity.com/html/hitec_pulley_56314.html
The box. This is optional of course. I found it very handy because it’s extremely durable and just the right size to hold all of my components. But I actually started out this project just mounting it to a $1 metal bracket from Home Depot, and I upgraded to the OtterBox later for convenience.
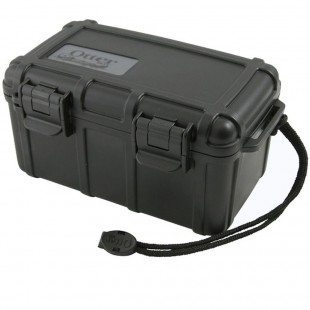
http://www.amazon.com/gp/product/B0000DYUZI
Fishing Line. Most fishing line will work, but try to get something pretty strong, so that it doesn’t stretch under the weight of the camera. You can get it at any sporting goods store for a couple dollars.
Alrighty, that’s the end of this series. As always, please post your comments and questions below. Also, if you build one of these and have any improvements, please share them! I’d love to see how you can make this design better.
Part One: The Gear
The first video/article was all about the gear (lenses, filters, tripods, etc). If you haven’t seen it yet, check it out here:
Part Two: All about the Camera
The second video goes very in-depth with the DSLR – I cover everything you need to know about formats, codecs, and dynamic range in order to get the most cinematic images.
Part Three: Magic Lantern
The third video was an in-depth explanation of how to use Magic Lantern and why I love it.
Part Four: Postproduction
And the fourth video was all about my postproduction workflow, handling DSLR footage, effects, color correction, etc.
24 comments
Man oh man, I’ve been looking forward to this one (pt5). You guys are teasing us though!! Now the pt5 video is password required. OY. Anyway, Merry Christmas.
Sorry about that! It’s live now 🙂
Hi David!
This is exactly the sort of thing I was just thinking about making after having used a friend’s (non motorized) slider
the other day. I read through the whole article, but did not get a chance to watch the whole 21 min. video, so sorry if you already addressed this: What prevents this from being done more quietly? Is there not a “whisper” quite servo available, or was it just beyond the price range of this project?
Thanks again for sharing this great article!
-Daniel
I’ve never been able to find a quiet servo that’s powerful enough to pull a camera and is commercially available, but if you’re aware of one, please let me know!
Hi David:
It is fairly easy to convert the servos to brushless and not so expensive…nice work BTW
Thank you so much for the video, I’ve been waiting for this. Can’t wait to build it myself and start using it!
I’ve watched all 5 of the episodes of this series and it inspires me a lot to go out and shoot with little and inexpensive equipment. Keep up the good work!
Great work David. Thanks a lot. I look forward to this build.
This is great David, thank-you, I’ve enjoyed this series immensely. I knew you would have a simpler version of a motorized slider than the other’s I’ve seen online. I have one question. I have a manual slider (bearings) I’m very happy with. My main reason for wanting this motorized slider would be time-lapse (I use time-lapse for lack of a better term) slider shots. “Breaking Bad” used this time lapse slider technique regularly as a transition. My question is, How slowly will this slider go? I’d like something that would take at least a few minutes to travel the track. My initial thought is that a smaller diameter pulley would greatly reduce speed (if needed).
With the large pulley wheel, it’s definitely going to move too quickly, but you could easily modify it. I actually did some similar tweaks to mine – instead of using a pulley, I used a very thin dowel. The line would wrap around the dowel, and the slider would move much more slowly.
Also, you could easily add a pulley to make it move even more slowly, though that would take a bit more work. The rigging setup would get more complicated.
Hi, with regard to the ‘sticky carriage.’ There is a technique for assembling the carriage so that it slides smoothly.
Check out:
http://www.igus.com/wpck/6541/filmtechnology
And watch the short ‘DryLin® W assembly instructions’ video
I use a smallish G clamp to apply the pressure and only use 1 bolt per bearing block.
Regards, Dave
Thanks for pointing this out, Dave. I do have my carriage tuned correctly, and perhaps “sticky” was not the right word to use. The carriage doesn’t “stick,” but it does still stop fairly quickly. There’s a bit of friction with those plastic bearings – much more friction than with a roller bearing slider. As I point out in the video, that friction is actually a good thing for the slider.
Put it this way: if you were to hold the slider at a 5 degree angle, the carriage would not move. You have to angle it at least 20 degrees or so before it moves when the camera is attached. On a roller bearing slider, the camera will start sliding with only about 5 degrees of tilt.
What a great Xmas present! Thank you thank you thank you for posting this. Cheers.
Wow! What a series – very well done/filmed and edited.
I noticed that you have knowledge of Arduino. I have build a custome slider (with belt and a direct drive motor) and used the Arduino Uno to do Shoot-Move-Shoot / Continous drive especially for timelapses. As in your case, the motor will make way too much noise to be used to capture any usable audio.
I bought a dolly shield called MX2 from Dynamic Perception. It comes disassembled but it is quite easy to solder. It comes with an LCD and it very customizable. Awesome product! Also the software is open-source so you can use it for free and even customize it (should you wish).
I too would be interested in how you did the moving star trails and maybe you do some more filmmaking series in the near future. Awesome stuff.
Kevin
Thanks David…this video was really looked forward to…and it it didin’t disappoint! 🙂
Just one question on the servo….the link you provided is for a servo that has a rotation of 90 degrees… and in the video i think i understood that you actually modified yours to work continuosly…
is it a hack that can be done without a programmer? …or is it better to buy the version that ships with already continuous rotatation for 20 dollars more?
sorry if it is a dumb question, but i really don’t understand anything of these things!
🙂
thanks in advance for your reply, and hope to see you soon in these pages with other guest posts!
Yes, you’ll notice that I mention this in my post as well as in the video. I recommend getting it modified by ServoCity, since they know what they’re doing. If you’re confident about doing the modification yourself, you can find instructions online.
Sorry David, i hadn’t seen you had even written it…:)…my bad!
Thanks as always!
By the way….just out of curiosity, do you plan on doing the piece on the timelapse too?
I would love to do a tutorial on the timelapse, but at the moment I’m too snowed with work to find time for it. I’m not sure when that’ll happen. If you follow me on Vimeo, you’ll get the first news of when that comes out.
I just got the little short slider kit from ServoCity that they now sell. Really quiet 20rpm gear motor. You can buy the little speed controller from them thats nice too.
First of all, beautiful short film. Gorgeous photography and I love the color grade.
Thank you for showing this DIY motor control. I’m wondering if how well you’d expect the system to work in this scenario: Set up the slider at an angle so in one direction, the motor pulled the sled up and in the opposite direction, gravity would create the momentum while the motor acted as the resistance. This would allow the rig to work in both directions.
Obviously, this won’t work for every shot, a flat plain is often desired. But for the times where you may want the option of both directions and the angle works, do you feel this system would accommodate?
Thanks for all your effort and sharing your knowledge.
Yes, that could work, but it all depends on the strength of the motor compared to the weight of the camera. It might be tricky to find the correct balance.
And, like you point out, that would be a somewhat odd shot.
Interesting this turning up. MrCheesyCam on youtube just did a nice auto reversing slider that I’m thinking of making. He needs quieter micro switches but the servo doesn’t sound very loud.
Yeah I saw that, too, and it looks very interesting. He’s actually not using a servo there – he’s using a motor. I don’t know what the exact sound specs are, but from watching that movie, it doesn’t sound like it’s usable in a professional dialogue-recording situation. It does sound quieter than mine, though. I’m definitely keeping my eye on it.
Ahh. Nice work! Loving this video bigtime!
Do you know how slow this setup can be? Is it possible to use with timelapse?
Or do you have another example of a servo that can be used for that?
David. You have saved the best till last! That is just a great set up for the slider and I would humbly like to make some suggestions to improve on it. I used to make radio controlled model yachts and you learn a few tricks once you hang around with that crowd for a while. The other group that will help with bits and bobs are fishermen. As they have had to solve a lot of these issues, in a small scale, when tackling tension, quick releases and small wallets.
1. Mount the motor BENEATH the slider. That allows you to utilize the whole track length and then just run the cable to the slide carriage around the END of the slider. This will work if you attach some plastic strip, such as the side of an icecream tub around the end of the track after you have smoothed the end into a nice ‘U’ shape. So the motor assembly (Otter box) is upside down and you just do all the setting up of the cable and connections prior to attaching to the slide. Then use the controller to make it move as you wish. To ‘unwind’, run the cable in reverse and run it out again.
2. If you get along to a fishing shop they will have some snap hooks that allow you to attach everything and disconnect really easily. They are very handy and will not fail under any load that we are using.
http://www.theessentialfly.com/MA-G1522.html?gclid=CNeZ2_7f6rsCFU1fpQodBmcAUA
Why use these? We are trying to use the maximum length of track possible and make the line run almost the entire length to the end. Once the carriage gets to the end of the track it cannot go any further as it cannot be pulled around the corner.
3. I hate fiddling with nuts and bolts in the field as I will usually lose something from it. This is a split pin that you can mount the box with as the first step in assembling the whole rig. So you would mount these pins so that the toggle on the them is pointing down towards the ground and drilled through the track. The length of the pin is going to be proud of the slide (as otherwise you will foul the carriage) and then the box just mounts on top of the pins. Of course the pins are mounted in a line. If you need more stability just add in another pin. You will need to glue or screw a BLOCK to the underside of the slider so that the box has something to rest on. The whole setup depends on the carriage being clear so once you clear the arms on the carriage you are good to go. The holes through the Otter box that you drill need to be pretty neat as any play in the holes will give a little (a millimetre or two) play in the system, but once the carriage is underway, that slack is taken up and the carriage just runs. You mount the Otter box by setting the toggles to the upright position, pushing the Otter box onto the pins and then pressing down hard. To keep it all in place just flip the pins over to the horizontal position and you are good to go. The pull is all in the vertical plane so the if the holes in the base of the Otter box are neat then the box will not move at all.
Any sailing shop with sell these. The ones displayed are just the model that we use here in Australia on real boats.
http://www.ronstan.com/marine/range.asp?RnID=248
As David noted in the video, if you want to haul around a bigger camera, get a bigger servo. REALLY big servos are called ‘Sail Winches’ and they can haul around many kilos as they have huge loads on them when the wind is blowing a sail around. But they do get expensive and they also use a lot more power. So we are getting a little further away from the “Do more with Less” ideal. So choose carefully.
Great video and it has happily ruined a good working week as I am thinking about my version of that slide most of the day…. Love it.