


Understanding how to light and how to harness light is an essential skill for anyone who uses cameras but to many it is very much a weak area.
If you are new to lighting or don’t feel your knowledge is as good as it should be this guide will be very helpful.
Over to the guys at Meadows Farms Studios!

Filmmakers and photographers alike will agree that lighting is key for the perfect shot. A natural, yet undervalued tool, which separates good filmmakers from the greats.
When used to enhance the film, natural and synthetic lighting draws the audience into the scene. Its ability to break down barriers and blur realities makes it a key component to consider when filming.
Any light kit, even an inexpensive one or a DIY one, will make a world of difference for your filming as opposed to having no kit at all, and not being able to use your extra lights to control the scene as necessary.
Below I have a few lighting tips for you to follow;
Key Lighting Concepts
Concept 1; Black Body Radiation
A black body is a delineated part of matter which is opaque and capable of absorbing electromagnetic radiation whilst emitting radiation of its own.
Concept 2; Incandescent Radiators
Incandescent Radiators are real life objects that behave like a black body in that they emit light of various colours in the visible spectrum as they heat up.
The colour of the light they give can vary from deep red to red, to orange, to yellow and ultimately to white.
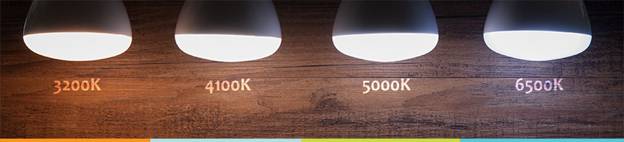
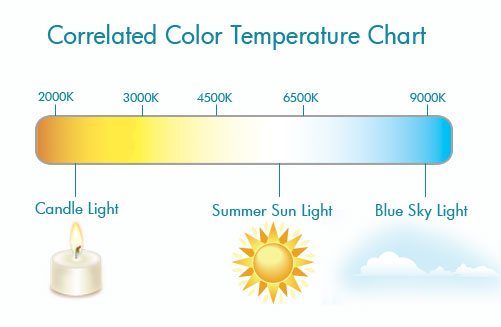
Concept 3; Colour Temperature (CT)
Colour temperature or (CT) is a value, in Kelvin degrees, given to colours of light in order to help in describing them as warm or cool.
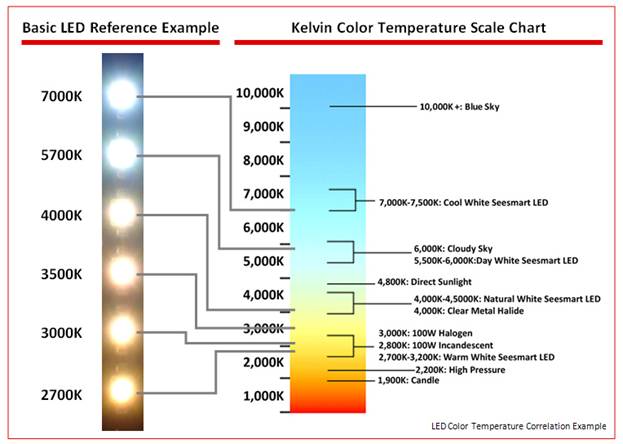
Concept 4; Correlated Colour Temperature (CCT)
Not all incandescent light sources available for video lighting today are radiators. Since the light some give is the result of other processes (such as electrical current stimulating low-pressure gases, etc.), they cannot be attributed a temperature.
Instead, they are given what is called a Correlated Colour Temperature (CCT). This is visually based and has nothing to do with the actual temperature of the physical object emitting the light because, as mentioned, they don’t heat up and glow like iridescent radiators.
Concept 5; Colour Rendering Index
The Colour Rendering Index measures the ability of a light source to radiate light in all the colours of its spectrum equally like iridescent radiators do.
Other CRI ratings:
– Household fluorescent light bulbs have a CRI somewhere around 80 (or lower).
– Photo and video quality fluorescent lamps have a CRI of around 90 or higher.
– The CRI for HMIs is generally around 95 or above.
– And LEDs would have a CRI between 70 and 90.

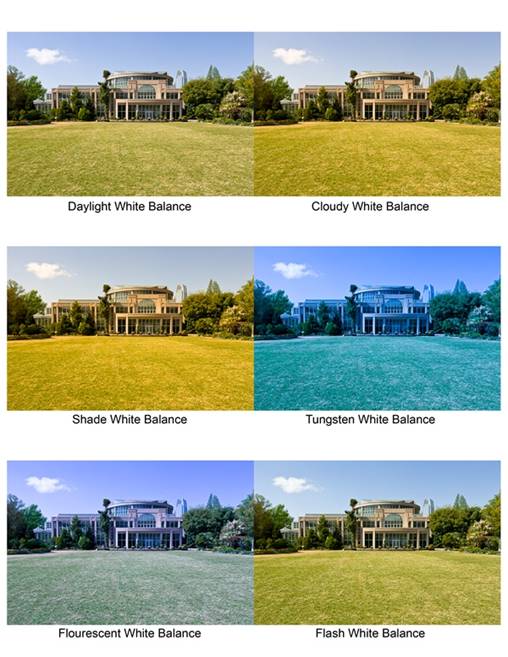
Concept 6; White Balancing
Through their sensors, cameras also have a range at which they perceive the world and render the colours in it. And, according to the settings you choose, this perception of colours can vary drastically.
When setting the camera up for a scene, the operator must pick a neutral colour point of reference and “teach” the camera what kind of colour that is. Most commonly, white is used as a reference. So, quite simply, this translates to choosing your reference for white, at a given location, within the light conditions present.
If the colour temperatures of the light sources vary, this will also confuse the camera and result in errors with its Auto-White Balance feature (AWB). So it’s best to not use it and instead white-balance the shoot yourself. It would be preferable to make all the lighting in a set-up the same Colour Temperature!
Lighting Methods
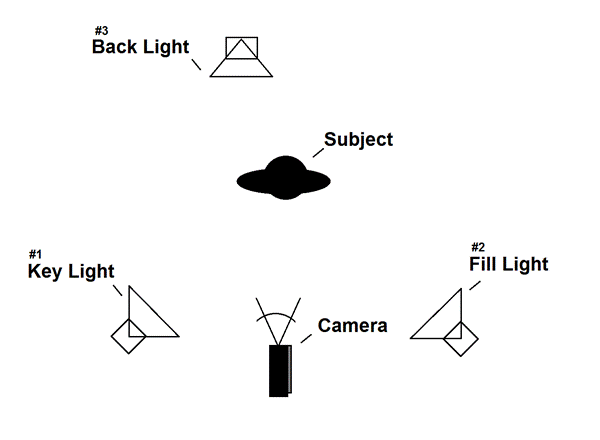
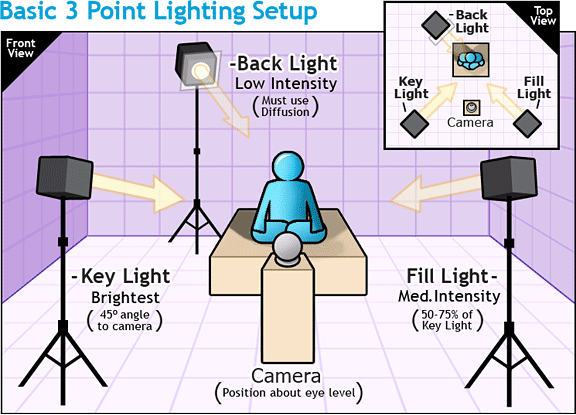
Three Point Lighting
The most widely used method and the one most recommended for beginners is the three-point lighting method. This method is the most successfully applied technique for lighting in the theatre, film, photography and CGI. It consists of three light sources:
I) The Key Light,
II) The Fill Light
III) The Back Light.
The Key Light
The key light is identified as the main light source and the strongest of the three lights. The key light needs to be positioned by the side of the axis created by the camera.
Fill Light
Its function is to help manage the excessive shadows created by the key light and consequently helping you avoid an imbalanced shot with regards to these shadows and lighting.
Its purpose is to manage the excessive shadows and not to get rid of them completely.
The fill light should sit the other side of the key light. The recommended angle of the light should be 45 degrees but feel free to experiment.
The Backlight
The backlight needs to be positioned behind the subject, either to the side or at a 45-degree angle. The light should be above the subject, shining down on them. The function of the backlight is to separate the subject from the background.
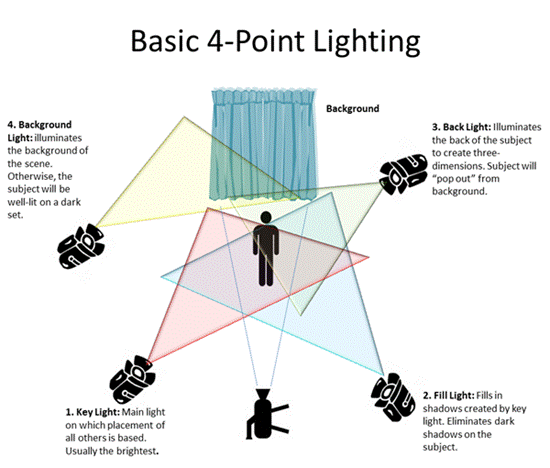
Four Point Lighting
A fourth light source can be added directly behind the subject. This light, however, will not light the subject, but the background behind the subject.
The strength of this light is that it can add even more depth to a scene or even erase unneeded shadows cast on the background by the subject and props.
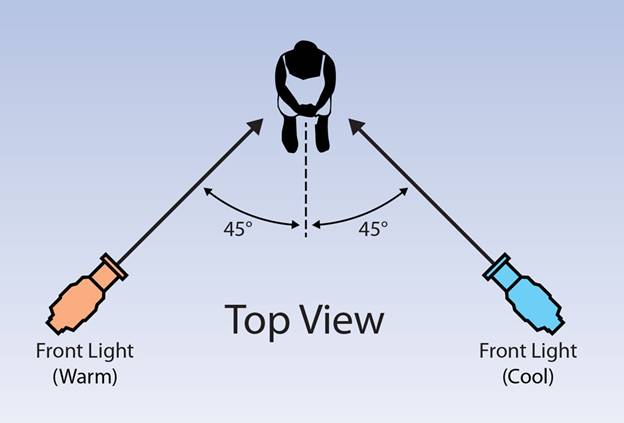
 The McCandless Method
Named after Stanley McCandless, an American widely thought of as the father of lighting design.
His method is designed to emphasise the key features of the actor and to ensure the actors are fully lit from the front.
In order to achieve this goal, two main lights are placed at 90 degrees to each other and 45 degrees to the subject. The lights differ through colour, one light reflects a warm colour and the other reflects a cool colour.
Equipment Selection
Types of Lamps
The most popular types of lamps used for lighting are;
– Incandescent,
– Fluorescent,
– Gas-discharge
– LED.
1. Incandescent lamps can be either plain incandescent or halogen incandescent.
2. Fluorescent lamps. These lamps work on a chemical interaction between the low-pressure mercury vapour and the phosphorus coating on the inside of the tube. When electricity passes through the mercury it makes the phosphorus glow.
3. Gas-discharge lamps work similar to the fluorescent ones but use ionised noble gases to produce their light and the process is different.
4. LEDs (or Light Emitting Diodes) work on electroluminescence, meaning that the material within them emits light as power passes through it.
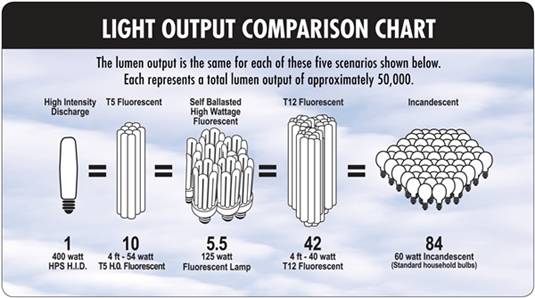
Watts, Lumens & Foot-Candles
There is sometimes confusion, even in the case of some manufacturers, regarding the light emission level of a certain fixture when calculated in watts. Once technology evolved past incandescent light bulbs, the correspondence between the amount of light produced and wattage was lost.
So, with the advance of technology, lumens and lumens/watt became the new norm to accurately express the amount of light a light source produces.
Other Helpful Tips
Identify if there’s any natural light in the room or any other light sources that will affect the shot. Treat them in the same manner as artificial lighting, in regards to testing and adjusting.
1. Calculate the Colour Temperature of the light that is present at the location. From here decide which lighting setup is the best.
2. Place the key-light
3. Place the fill-light
4. Place the backlight
5. Place the background light if a 4 point lighting system is required.
6. Consider if other modifiers are needed.
7. Prepare camera with white balance technique.
8. Apply and create your masterpiece!
Make sure you real the full guide from Meadows Farms Studios here !
