

Yes it’s another post where 4K video features highly. You just can’t get away from it! But this post is not about making a 4K film – it’s about using 4K to make a 2K film.
I have just finished a 3-day speaking tour with TV-Bay for the Broadcast Show tour in Belfast, Leeds and Pinewood Studios. One of my talks was all about the pros and cons of 4K and raw. Although I didn’t use raw in this film, I used 4K enormously. In these talks I talked about reframing in 4K. Something we traditionally have rarely done because it looks so bad in SD and even in most HD. The only time I did it regularly was with my old EX1 shooting 1080p but editing on a 720p timeline.
With 4K TVs, channels, distribution etc being rare to non existent, why are so many people shooting 4K, myself included? Part of the big draw is just that the image looks so lovely, yes better than HD of course. So even for HD stuff for myself I shoot 4K and downscale it to a lovely 2K image. The other big draw is that we can reframe with 4K…with some caveats.
When you take a photo on your DSLR, is that the image you use? Never re-framing or cropping? Of course you do! With large resolution in photos, that ability to crop stuff out and tweak our composition is common and, unless it’s done to an extreme, you just can’t tell.
Now with 4K and higher video on HD timelines, it’s becoming quite common. In video, the danger of course is we use this reframing ability to be lazy and not get coverage. That’s a bad idea, never be lazy….also the frame size will change but the DOF won’t, nor will the field of view, that would change by cropping but would on a tighter lens giving a better looking image to cut too if they are cut together. Also if the image isn’t completely clean you will a change in the grain structure, suddenly that grain looks bigger. Something to be very wary of.
But sometimes the convenience is worth the cost, as long as you really are not getting tighter shots as a matter of course simply because you can’t be bothered when you have the glass and the time to do it. It’s often a great get out of jail free card when stuck editing.
A good example of when you might use this in a practical situation that is beneficial to you is interviews. I shoot most of my interviews in 4K, regardless of whether they are going to HD, 4K or even SD! I am able to get a tight and a medium on one camera which means I can chose the framing in post. Very useful indeed. I do this even though I knot that my cropped-tight shot won’t look as visually appealing as if I had gone tighter optically. Nothing in life is without cost! 🙂
So other than the use of getting you out of sticky situations in post and the practical use in interviews you can also use 4K in a very creative way. This is what I have done with this short film “From Chicago to the Moon”


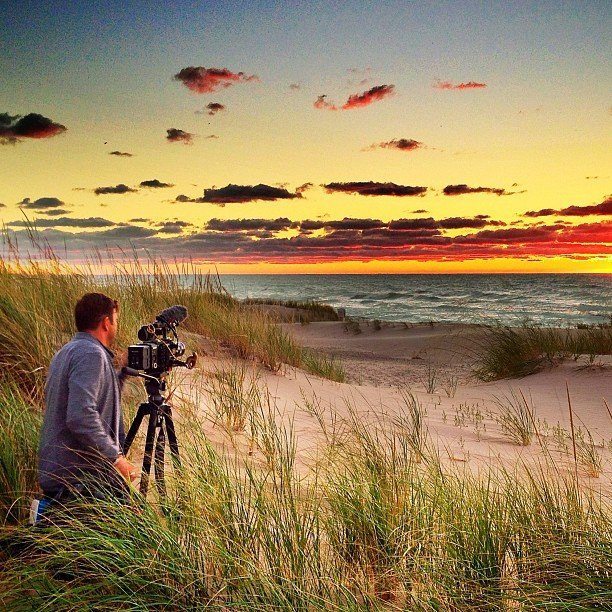
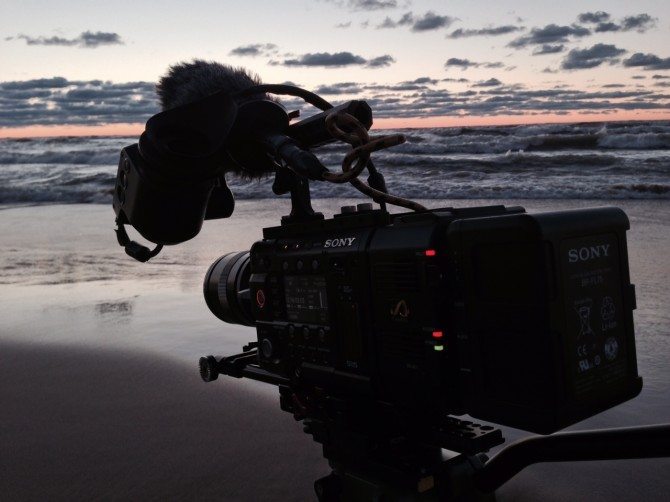
I was in the US last month to make a short documentary about the Amish. Early on in the trip, in fact the very day I arrived after flying in, I went to have dinner with a friend in small town on Lake Michigan, but I was clock watching as I saw the clouds and was hoping to get a lovely sunset on camera. We missed it really, by the time we ate, paid and I was set up I had 5 minutes before the sun vanished. I mostly just had the afterglow, the nicest bit, but it would have been nice to have both!
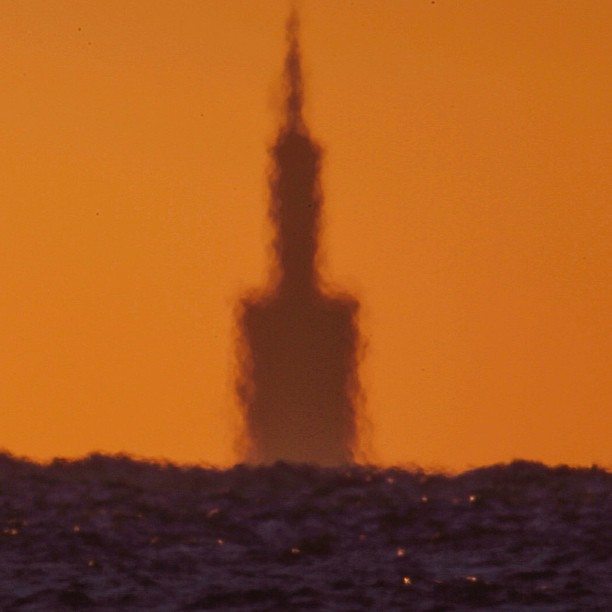
That didn’t stop me. We just so happened to have with us an 800mm Canon F5.6 Prime lens, and I desperately wanted to us it! I have never used one before, and it’s a beast, super heavy and super expensive BUT has a super lovely sharp image. The reason I wanted to use this was you could see Chicago across the lake…that’s 40 miles away.
On the sand by the water, you can just see the tops of the Chicago Skyline. The curvature of the earth means the horizon at my level and with my height is around 3 miles or so of visibility, but because those building are so tall I was able to see them. So when I went a little bit higher, around 15 higher than the water, I was able to see that skyline even more. If for some reason the Burj Khalifa (the world’s tallest building) was there and I went up to the top I would see all off Chicago…and then some! Around 64 miles visibility!
So after looking around for the Burj Khalifa and any skyscraper by the water I realised the 15 foot option was the best I could do.
Now…this is a long lens but it wasn’t long enough for what I wanted to see, I wanted to fill the frame with the top of the skyscraper. Luckily, I had my 2X Canon extender and my friend had his. Not the sharpest things in the world, but they do help. I also had 4K resolution cameras, my 1DC and F55, meaning that if I shot in this format I could take my 4K image and crop it on my 1080p / 2K timeline to get a “digital doubler”.
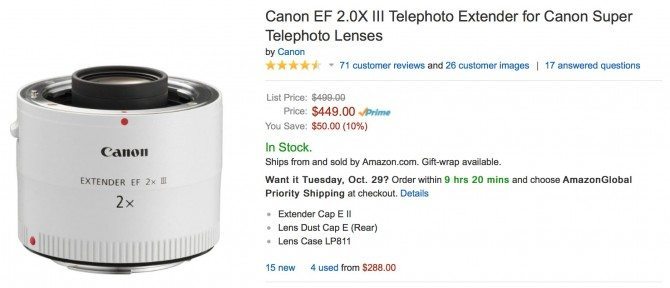 Canon EF 2.0X III Telephoto Extender for Canon Super Telephoto Lenses
So with the 800mm lens and one 2x extender I was able to get 1600mm. With another one that’s 3200mm and with the “digital doubler” that 6400mm. That’s a long lens! 🙂
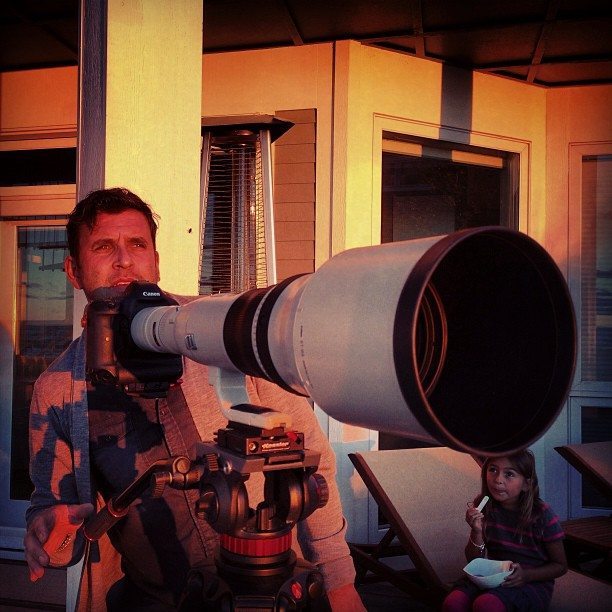
The problem is that those doublers are not doing that lens any favours. The image becomes much much softer. In the above photo you can see me with both extenders on. Now I did this for a few shots but I preferred to use one, still softer of course than without buy acceptable, knowing I had the option of the “digital doubler” in post.
I did use both occasionally, but the problem, other than if gets even softer, is the lens becomes really down and that means it needs a lot of light, and any crap on any of those lens surfaces will be seen. That’s the sensor, two on each extender and two on the lens. That’s 7 things to make sure are spotless. You can get away with not completely spotless with big apertures. Not here though. F13, F22. Not the best F-Stop in the world for any lens…that’s the downside of optical extenders.
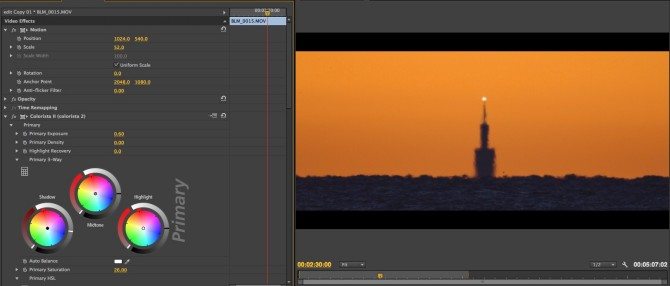
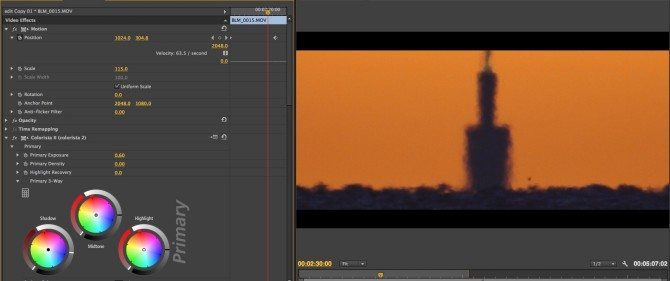
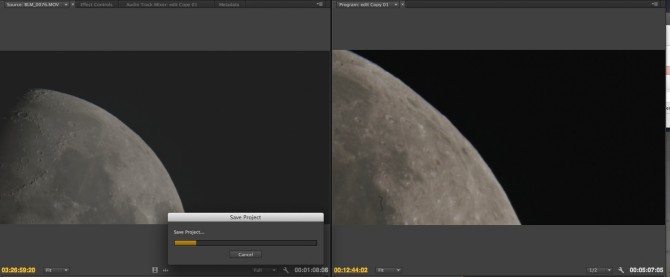
Below is a cropped frame grab of the former Sears Towers, now Willis Tower. I shot this with one extender and used the “digital doubler”. In fact if you look at the two screen grabs from premiere CC you can see the original frame, scaled down to around 50% on the 1080p timeline and you can also see the ones where it’s zoomed into 115%. Yes past 1:1, as the image is so detailed I could easily crop it this much more and even further if I wanted to. That’s the joy of the 1DC 4K video image. It does need light to look its best though, of course. Noise looks bigger and uglier when cropped in so with an optimum ISO of between 500-640 it’s clean as whistle! That’s the biggest downside with the “digital doubler” be careful of any image defects as you are simple going to magnify them.
I had very little time with the skyline as I mentioned. My own fault. Never have dinner before a beautiful sunset. Get your priorities right!! I just had to make do with the time I had. Probably no more than 15 minutes with the skyscrapers shooting on both cameras.
Luckily there was no wind, which meant the lens stayed pretty steady, although we were filming from a wooden deck so I had to record and move away from the camera. Image stabilisation does work through these doublers, but the image doesn’t stay static, it floats. Because I wasn’t watching the recording to keep it steady, I also didn’t notice the dirt. A shame. I am sure it can be cleaned up easily enough in After Effects! That’s the problem with these lenses with tiny apertures, they show up EVERYTHING!!
With the F55 I used a couple of Zeiss primes and the lovely Sigma 18-35 F1.8 (which works with a tiny vignette in 4K mode) I knocked off some establishers which you can see at the beginning of the film and end…bookends. It’s a real shame I don’t have a Canon EF adaptor for my F55. That 1.6x crop of the S35 would have helped me even more…then again I would have needed lots of support rods. No using the camera as a back cap like I did with my 1DC!
A big advantage of the 1Dc over the F55 the ability to take some nice raw stills with the 1DC at the same time. You cannot do that with an F55.
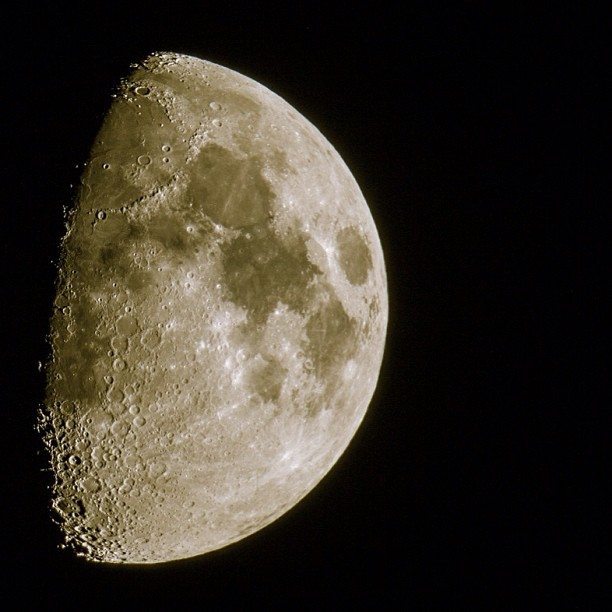
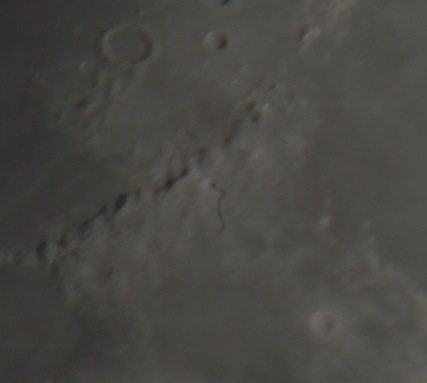
Once the light was gone, what next? A quick look up? A gorgeous clear bright moon. So I did the same with that! The Moon is of course incredible bright so the lack of sunlight didn’t matter.
With this lens combination, I was able to shoot the Moon with a clarity I had never been able to do before. Naturally the 800mm on its own looks the sharpest and most detailed. You can see that from the wide shot in the film. One extender was acceptable. Two became a bit two soft…but again with the croppability….
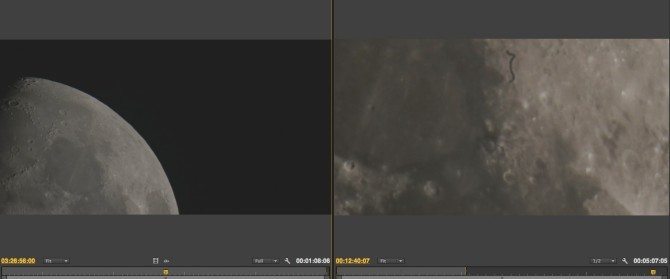
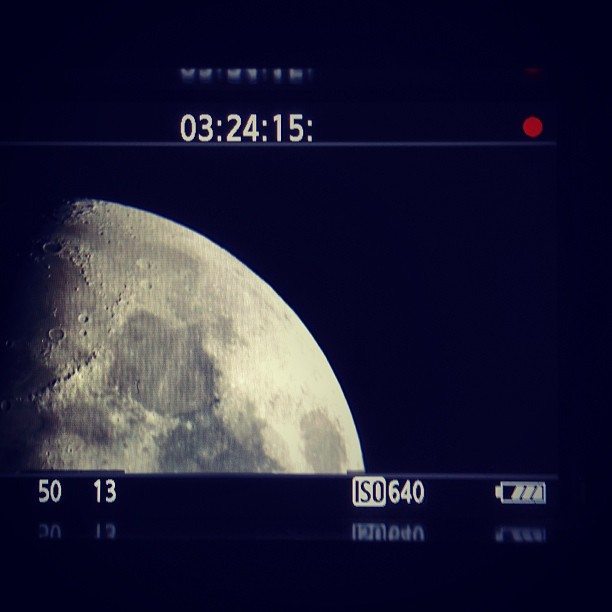
I love both of the the things I shot here, the skyline and the Moon. The abstract towers of Chicago are still mind blowing to me, and to shoot the moon at this focal length was such a joy, and the shot where I digitally zoom in on the a 4K shot of the moon on my HD timeline really shows you just how powerful 4K can be in creative terms. No way I could have gotten that shot without this resoluton. Not even with glass…
There are NO speed ups here. This is all real time video. There is also just one camera move, and that’s the early wide pan on the beach. That really is how fast the moon moves, as I said the zoom is digital, as is the tilt down from the Willis Tower to the water.
So here is a great example of using 4K as a creative tool. I could make a 4K master, I just would not be able to do use the “digital doubler” as much. But it is do-able and I really should do one…just because I can! 😉

chicago to the moon v3 from Philip Bloom on Vimeo.
Created with Admarket’s flickrSLiDR.
16 comments
Awesome work Phillip, waiting for you to reupload the video so I can watch it.
Hello Philip Its a very nice conceptual idea the music adds a lot to the piece makes it alive! It may sound like an odd comment, but i feel using the warp stabilization on this could have helped remove some of the rolling shutter effect on the motion of the moon in a very efficient way, maybe not using the “warp” but only the “position” option because the warp often tends to increase the “jello effect” of things and motions it doesnt quite understand.
The narrative is pretty nice! hurray for 4k!
hi christian.
i actually did do a tweaked edit than finally got put up this morning, been a few issues getting it off the computer. i used warp on a couple of shots of the moon to make it a bit steadier.
thanks!
p
So much nicer! Like it a lot!
I like the abstract images a lot in this piece, and the moon is just so cool! Nice work. I bet you wish you had a monster heavy duty tripod for that 800mm. Did you rent the 800mm? That lens is expensive! $13K Ouch!
Philip, How did you come to own two 2x extenders? Was Canon having a buy one, get one free sale?
think you may have misread. I had one. Eric had one.
The screen shots of the moon are with 1/2 quality in premiere……… just saying, shoot the moon on gh2 with 300mm nikkor (2x crop +2x dubler=1200mm) was tuff to keep it stabile !!! good job…… wondering why the towers are out of focus?
not sure what you are saying? I should have shot this on a gh2 and it would have been better?
Why the towers are out of focus? You mean the haze? They are 40 miles away…
sorry for miss understanding , i said what i know how it is to hold it steady, was hard for me to hold it steady on 1200mm !!!!wow so that was the haze………..
Unearthly beautiful, almost like sciencefiction. Love the way you used the sound in this one.
I thought that was a GREAT and intriguing short and really enjoyed it. Thanks so much for all the information you provide on the site PB. It’s such a great resource.
Back in 2001 I used a telescope with a webcam. I would take a Philips webcam (that egg shaped thing) twist of the lens hot glue a 5mm film roll container on it; I had the bottom cut off. I stuck that in the eyepiece holder, focused the telescope and took 300-600 images of the moon (or Saturn or Jupiter) and stacked those using an average blend.
In a program I wrote.
It would align all the images based on a predetermined area and it would than average each pixel of each shot, which resulted in images that are even nicer than what you see here now — not to mention cheaper my telescope was a mere 600 pounds the 800mm is probably just a tad more expensive.
So now I wonder if we’d mod a 4K camera in a similar way would astonishing detail we can get from the skies around us. I haven’t used my telescope since 2002 anymore (too much light polution here in The Netherlands and it was always extremely cold, because the skies are only clear enough when it freezes).
But I may feel an experiment come up — would it be a good reason to invest in a BMCC??? I will have to ask my bank account 😀
That’s amazing – The water is curving away from us and the towers are hidden behind that bent. Thanks for capturing that.
As you, I also believe in 4K for may reasons and can’t wait to pick up the Convergent Design recorder for my FS700 (I know, the 4K is a later update).
I also can’t believe how close you brought us to the moon – so much to see.
That must have been a lot of fun.
thanks….looks great. Here’s another view re 4K and ‘better pixels’
http://www.hollywoodreporter.com/behind-screen/why-4k-might-not-be-636485
P,
Enjoyed this one. Some stunning images– watched it projected and even on vimeo things held up quite well with 100″+ screen. Absolutely love observing the distortion that occurs at those distances. What causes that? Wind bending the light? Heat thermals? Has that classic desert oasis hallucinatory feel. May have to summon reddit to explain that one.. more on topic: Have you played with the new detail preserving upscaler in AE yet? Uses same subsampling tech as photoshop. My limited testing shows a perceptible improvement over relying on PP’s stock scaler. The opportunity to digitally blow up 2x+ becomes even more tempting, especially if you feed it absurdly high res sharp images. CHEERS